|
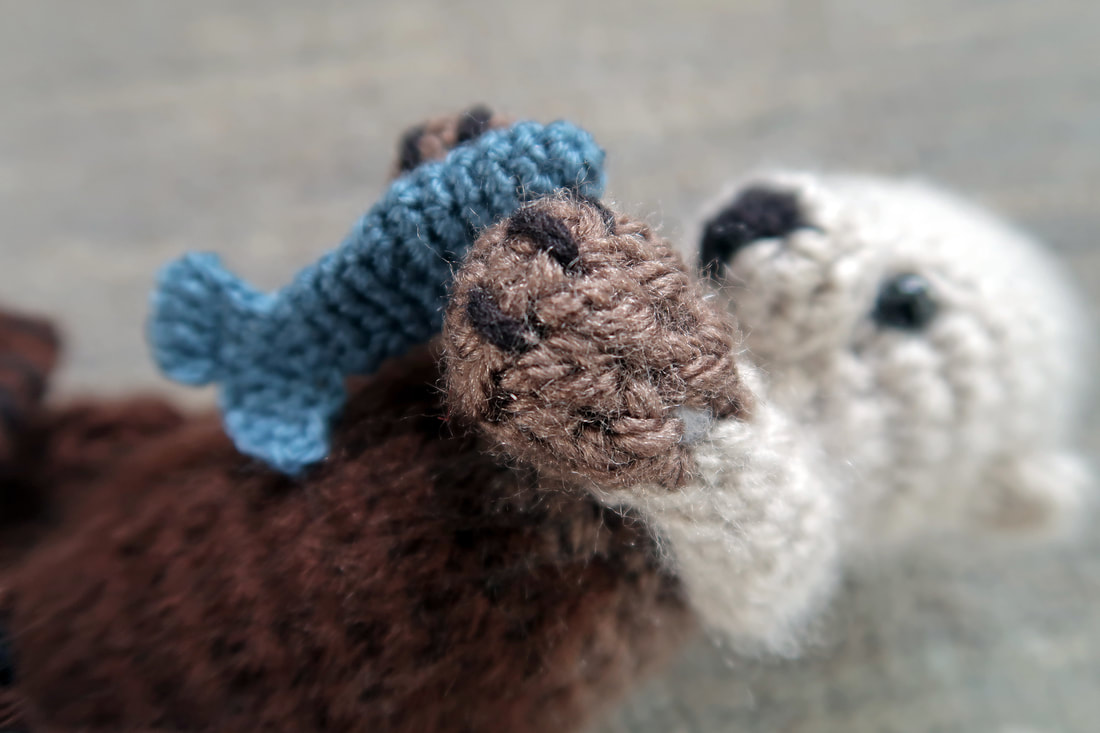
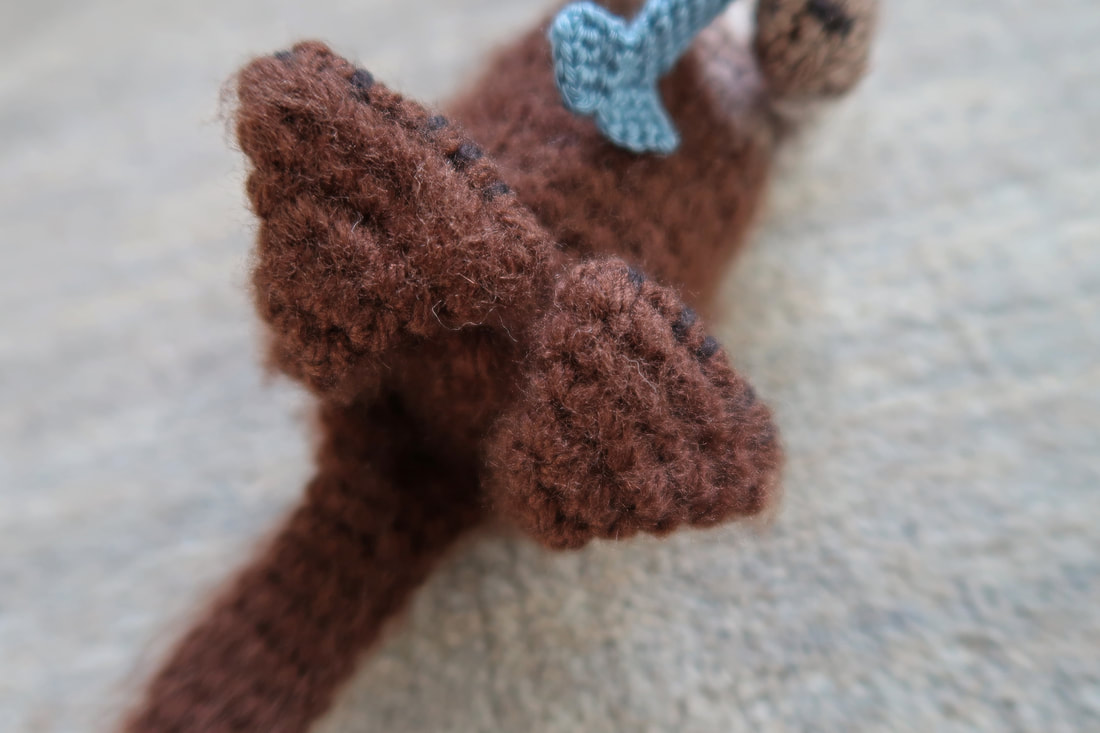
Say hello to my sea otter; inspired by the 'otterly' adorable sea otters at the Vancouver Aquarium.  Creating your own creature from scratch is rewarding, I must say. You have to apply all the crochet techniques you know, and the ones you will learn, and put everything together in such a way to create your creature. There were definitely some parts which required some trial and error. Sometimes I would start a certain way but realize the stitches were not coming together as I envisioned, so I would undo it all and try again. This definitely adds work and time but it's worth it, and I'm quite pleased with how this little guy turned out. 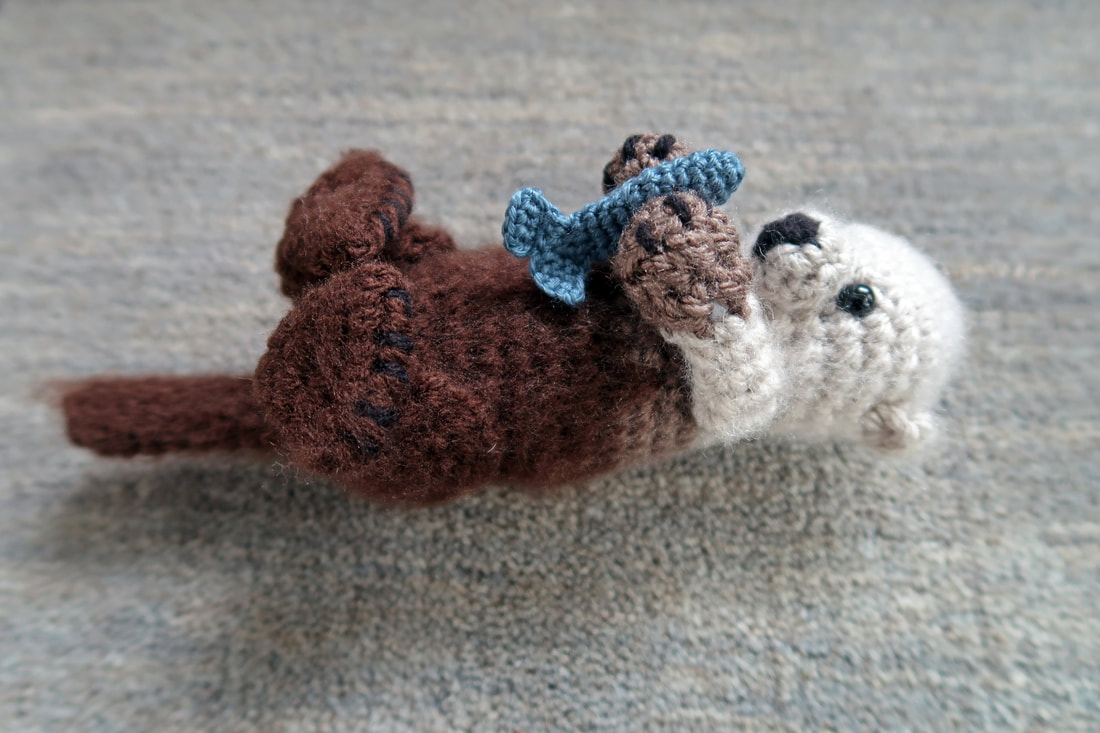 I did not write the pattern first; with the exception of the head, the pattern was created row by row as I stitched along. I already had an idea of what size to make the head and then 'winged it' from there. I did sketch out how I wanted the sea otter to look and looked at a lot of pictures of sea otters beforehand. By creating a sketch beforehand, I felt I had a good idea of the proportions of each part. I also used the size of past projects to help me envision what size of sea otter to create and how many rows to stitch. For the free pattern, please click here.
I brushed the yarn to create a 'furry' look and to finish it off, made a little fish the sea otter can hold. Materials used:
3.5mm crochet hook, stuffing, safety eyes. 1. Head and arms: Lion Brand Vanna's Choice in Linen; medium weight [4]. 2. Paws and upper part of body: Lion Brand Vanna's Choice in Taupe; medium weight [4]. 3. Bottom half of body, tail, feet: Loops & Threads Impeccable in Chocolate; medium weight [4]. A small amount of black yarn was also used for the nose and claws.
3 Comments
To get into the Christmas spirit, I wanted to crochet something Christmas-y. I was looking for something quick, something new, and something I could gift to my lovely coworkers. It needed to be something that I could repeat and complete in a timely manner. So I decided to make personalized Christmas ball ornaments! 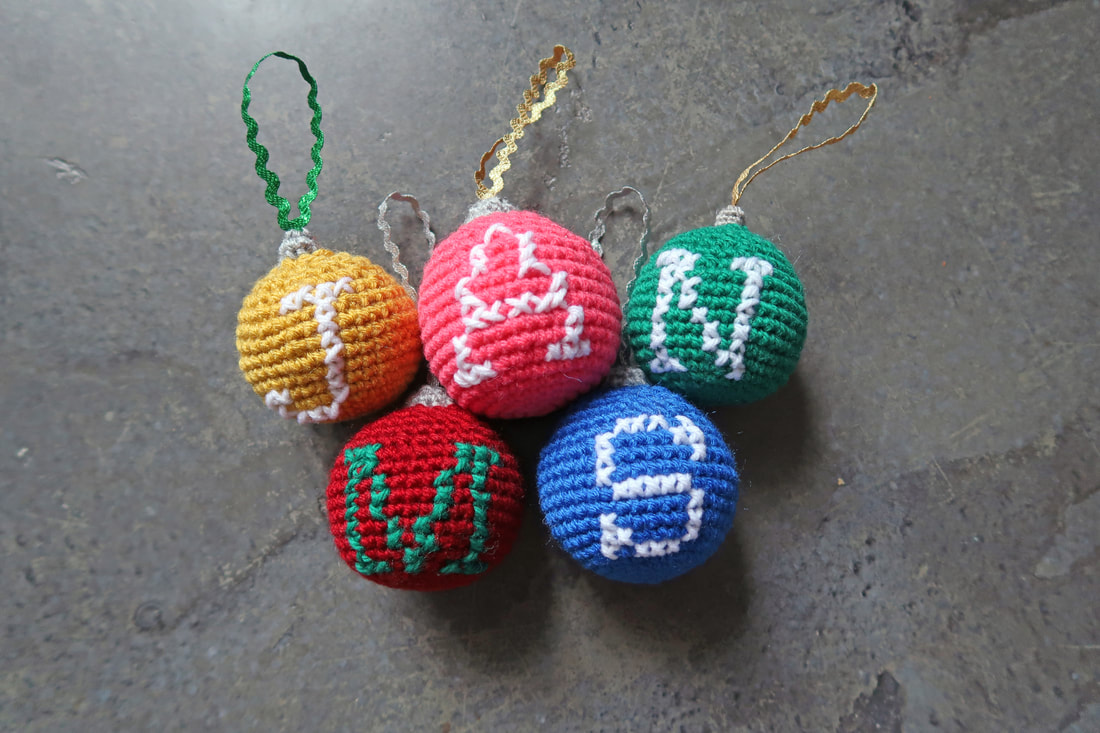 Something quick: I completed each ornament in about a hour and a half (including cross-stitch and finishing time). I followed the patterns for the 20-row and 22-row sphere (click here for a free pdf copy from Ms. Premise-Conclusion).
Something new: I had not made these before so it was fun figuring out the best way to make these, what colours to use and how to attach a ribbon for hanging. I decided to cross-stitch a letter on to each ornament. I looked up some free cross-stitch templates online and followed the template for each letter. Each letter was complete before stuffing and closing the ball. Cross-stitching definitely got easier (and better looking) with each letter I stitched. Cross-stitching is easiest when you have a grid to follow which worked for the most part except where I hit areas where there were decreases. Whenever I hit a decrease I had to improvise a little in order to keep each cross-stitch consistently the same size throughout. This project was also great way to use up some leftover yarn as very little was required for each ornament; for once I didn't have to go out and buy more yarn!
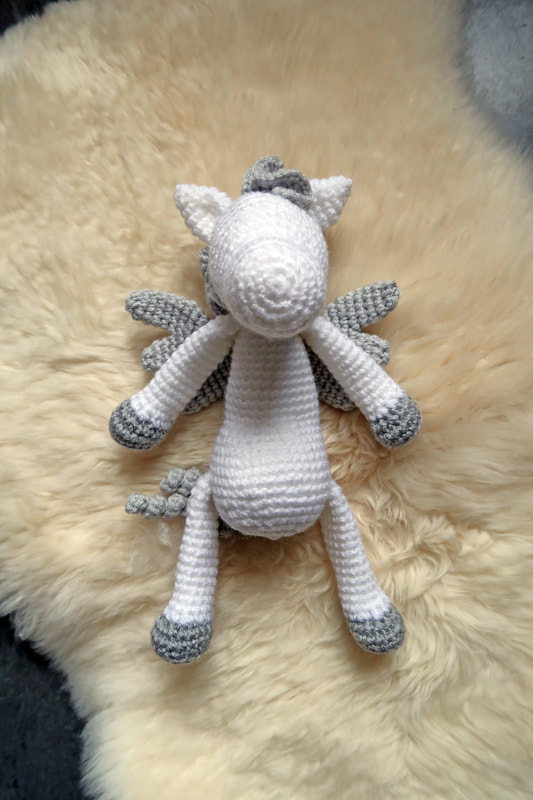
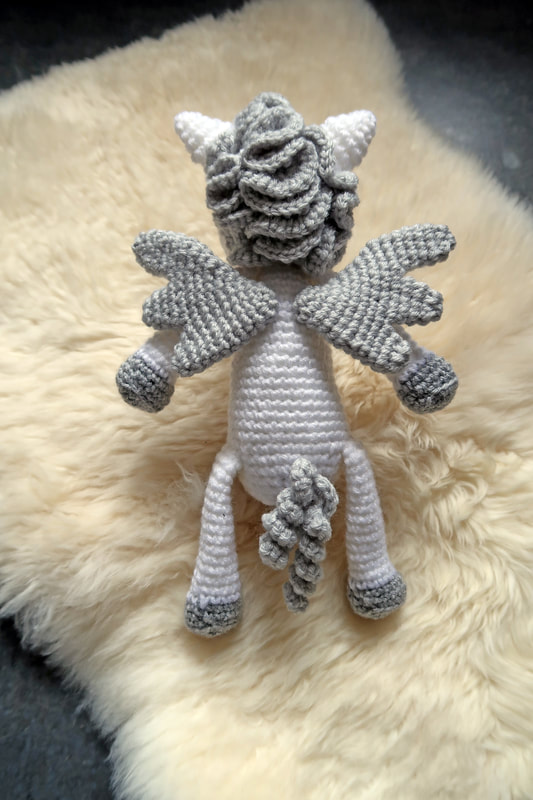
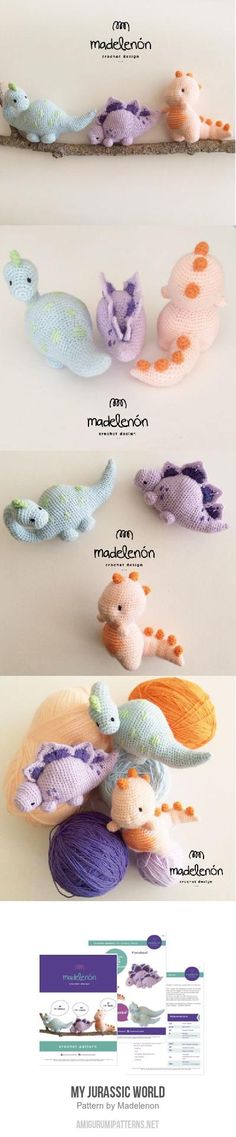
Pegasus was created using my own pattern which is based off of the same pattern I created for my unicorn.
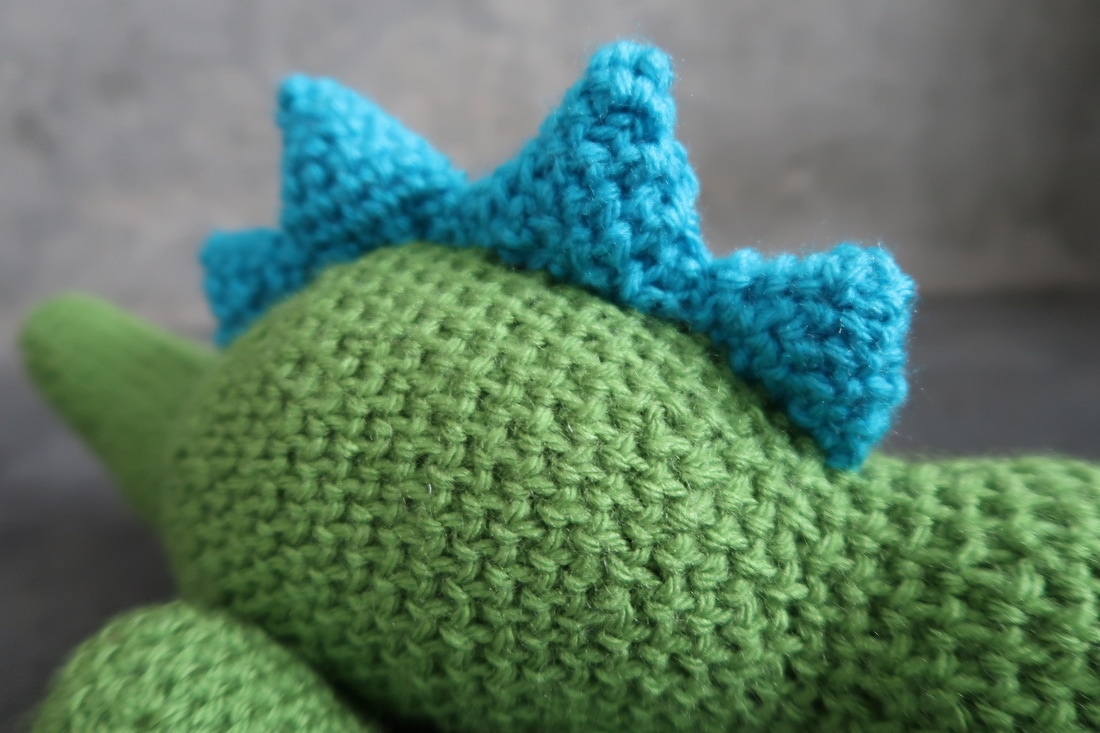
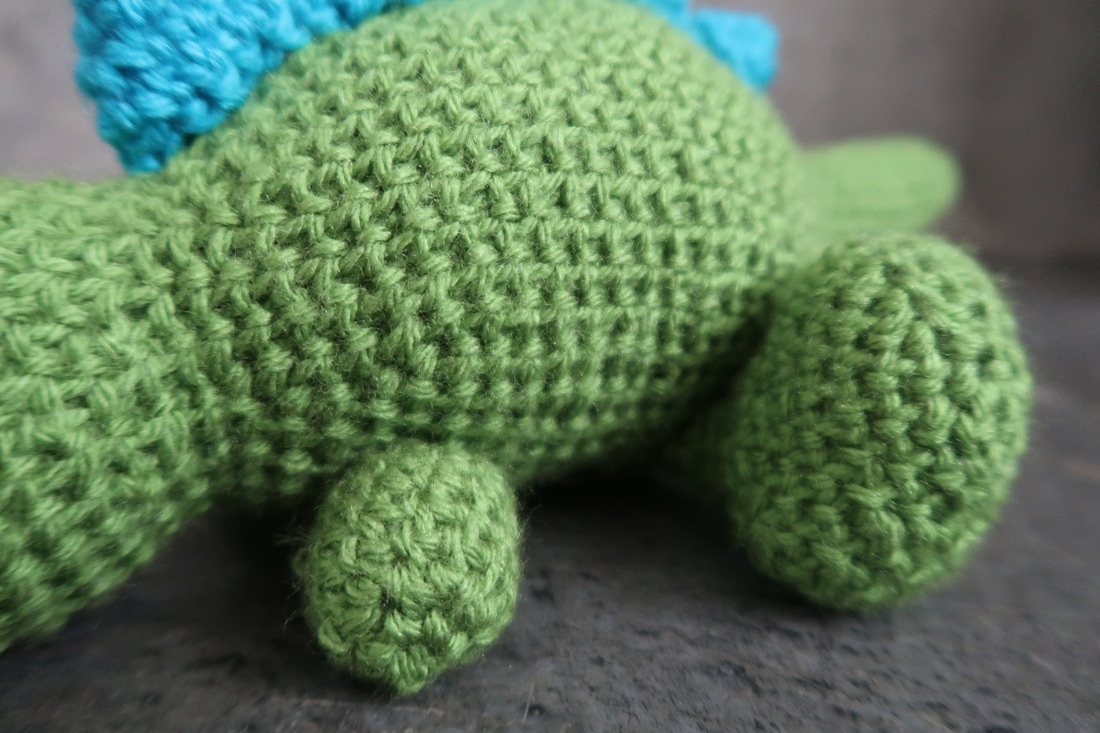
Materials used: 4.25 mm crochet hook 1. Lion Brand "Vanna's Choice" in white (medium weight [4], 156m/100g). 2. Lion Brand "Vanna's Choice" in pale grey (medium weight [4], 156m/100g). 3. Lion Brand " Vanna's Choice" in silver heather (medium weight [4], 156m/100g). Stitches: Slip Stitch Chain Single crochet Techniques: Magic circle Crochet in the round Increase Invisible decrease Colour switching Branching Hand-sewing The best crochet projects are the ones that I'm gifting. The thought of smiles on my friends faces and an image of their future little one holding this - priceless. With their first child on the way (a boy!) and a love for dinosaurs by the parents-to-be, I couldn't resist making this baby dino for them. 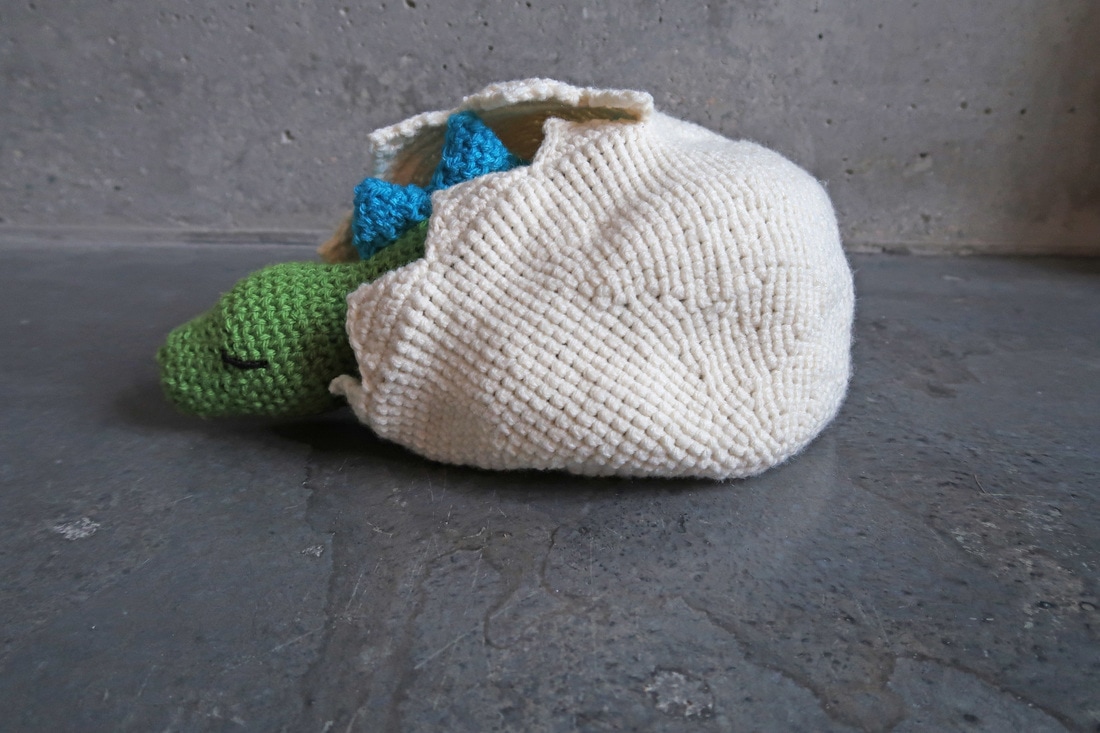 To my surprise, this dinosaur was one of my quickest projects to make so far. The body is one piece created starting at the head and continuing on to the tail. All limbs were made separately, stuffed and sewn to the ventral side of the body. All four dorsal spikes are individual triangles which were lightly stuffed and sewn to the body.
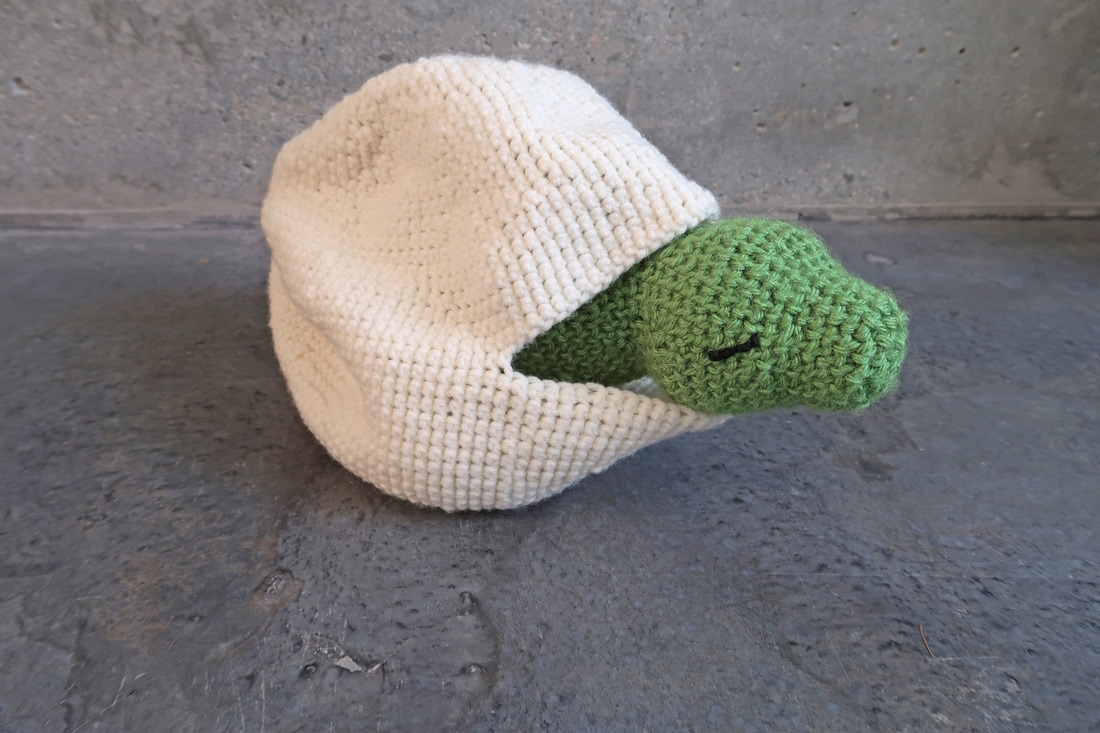
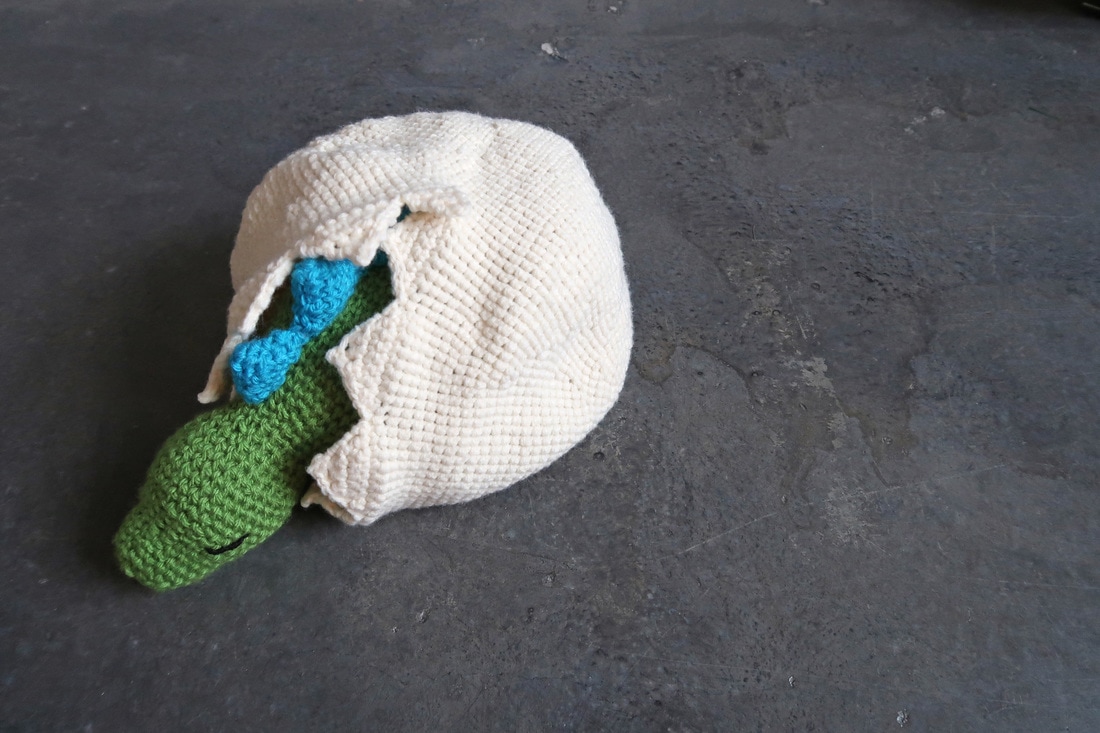
I tightened up my tension and used a smaller hook than when I created the unicorn. This resulted in a firmer body. In some situations that may not be ideal, but I think it adds to it's durability as I imagine the baby will be squeezing and handling the dinosaur a lot. Attaching limbs is my kryptonite. I usually attach limbs, undo it all and re-attach them a few times before I am satisfied with the placement. This dinosaur was no exception as I struggled with attaching the rear legs. At first I placed them too far ventrally (towards the belly), then too far out on the sides; I was trying to get to that happy place where it looked like the dinosaur just flopped down and took a nap. If you want to avoid all the attaching and re-attaching I went through, I highly recommend using stitch markers to loosely attach the limbs and mark the exact placement. When I completed the dinosaur I felt like something was missing. That is when I came up with the idea of making an egg from which the dinosaur could "hatch" from. I didn't want to sew two halves together so at the mid-point (row 28), I added stitches to the round like normal, but only halfway, and then I made a chain the length of the remaining number of stitches in the round to create the 'break' in the egg. Then in the next row, I stitched through the chain I had just created and half of the original round. After that, it was business as normal and I continued making the second half of the egg. The triangular edging was added once the egg was completed and what a difference the edging makes! 2018.07.23 Pattern now available!
Baby Dino Materials: - 4.25mm hook - Lion Brand Yarn, "Vanna's Choice" in Fern; 170 yds, 3.5oz/156m, 100g [medium, 4]; 1 ball. Used for the Dino body. - Lion Brand Yarn, "Vanna's Choice" in Aqua; 170 yds, 3.5oz/156m, 100g [medium, 4]; 1 ball. Used for Dino dorsal spikes. Dino Egg: - 4.25mm hook - Loops & Threads, "Impeccable" in Aran; 277yds, 4.5oz/253m, 127.5g [medium weight]; 1 ball 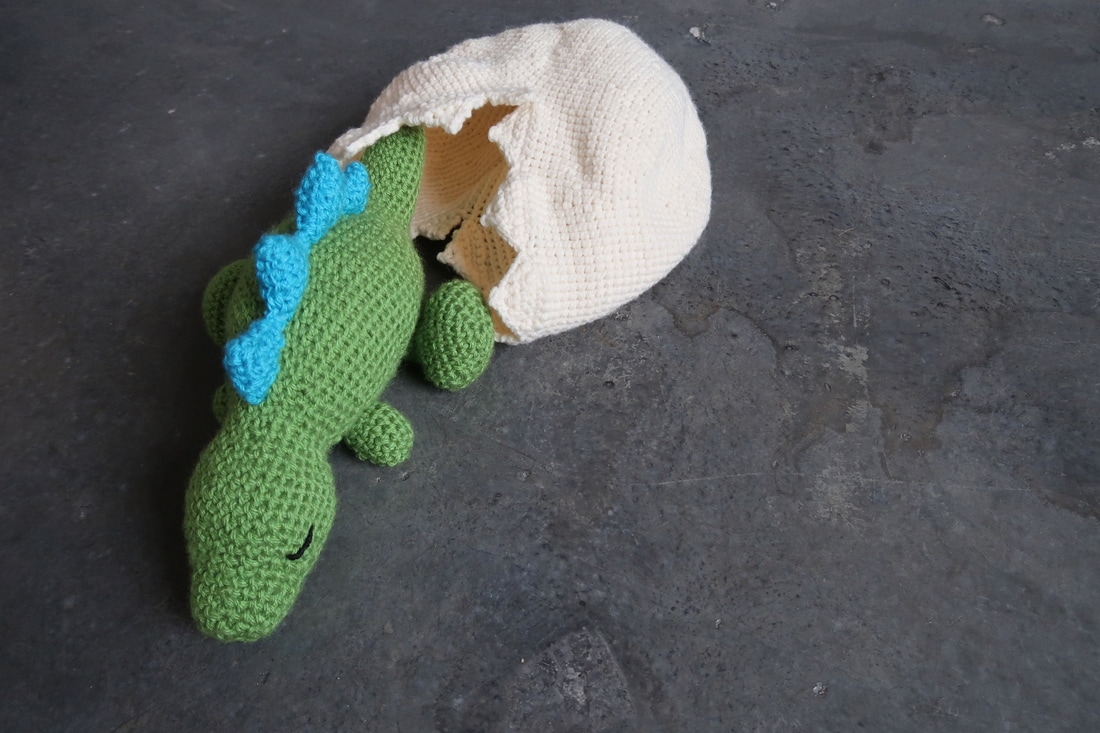 Search "Amigurumi" on Pinterest and you will be inundated with an endless assortment of cute yarn animals, succulents, fairy tale creatures and more. So what is Amigurumi exactly? From Wikipedia, Amigurumi is the Japanese art of knitting or crocheting small, stuff yarn creatures. Amigurumis vary in size and there are no restrictions on size or look. Pictures above are all taken from Pinterest when searching "Amigurumi". The last image is what inspired my first successful animal.Many thanks to my cousin who got me on this craze. She started making Amigurumi first, and shared every step of her irresistibly cute projects. With each progress photo I found myself getting more and more excited, even a little envious. Once she was done her first one, a bear no bigger than 5 inches tall, I knew I needed my own. My cousin recommended that I become familiar with crocheting spheres as most animals require a sphere for their head. She even passed on a handy set of patterns for different sized spheres (found on Pinterest, of course). I may have gotten a little too ambitious in making my first bear. I also didn't brush up on my increases and decreases and ended up with spheres with holes through which the stuffing poked through. I shared my troubles with my cousin and she quickly got me back on track. I practised making some more spheres, but since I wasn't following an actual pattern for a bear, there were more frustrations when I made the bear's body, legs, ears...well, basically everything else. The whole process consisted of trial and error. I just wanted a cute little bear of my own and I let my impatience get the best of me. I did manage to make a little bear eventually, but boy, was I not proud of it. Yes, it did look like a bear but his body was uneven and the proportions were off. Fortunately, this didn't discourage me and actually fuelled me to get better and try making another one. Practice, practice and more practice led me to my first successful Amigurumi. And by successful, I mean it looks mostly how I wanted it to and I'm not afraid to share a picture of it. Say hello to Monkey! This monkey was created for a special little girl; monkey - for Year of the Monkey in which she was born, and black - for her surname. This time the experience was much more positive as I was determined to make this into a gift. It even became exciting as I saw my work come together and actually look like a monkey. Finally, I was proud of what I made. 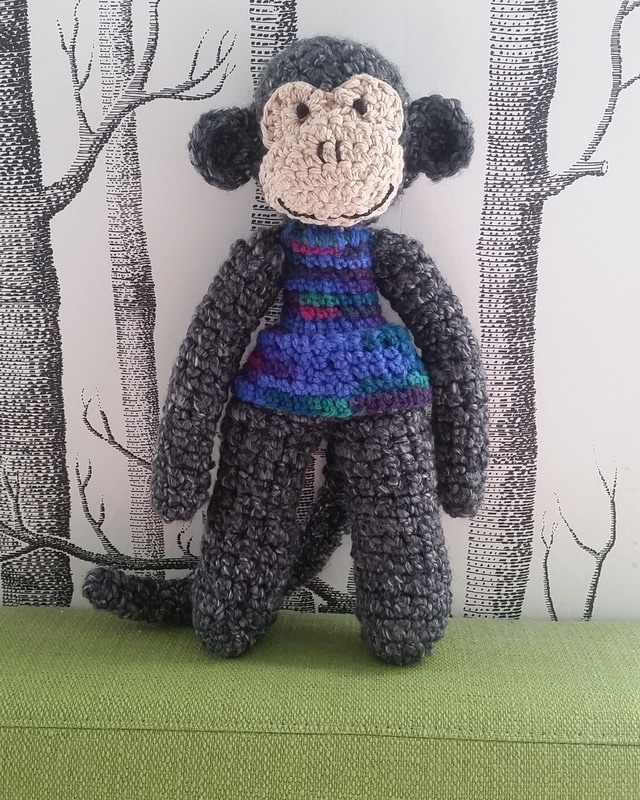 Monkey was created using Lion Brand yarn for the body and Bernat cotton yarn for the face. Yarn brand for the dress was not recorded. What did I learn from this process?
First: Patience is very important! Don't expect to immediately know how to crochet an animal just from looking at one; especially when not following a pattern. Second: Practising some basic crochet shapes such as spheres (head), circles (ears) and tubes (arms and legs) will help make the process easier. When in doubt, there is usually a YouTube video which can help with those key shapes. If you need a pattern, browse the web. Pinterest is a great place to start and there are lots of patterns on Etsy to purchase as well. Thirdly: The first one is always the slowest. This sort of goes along with patience. Don't be discouraged if it takes hours, or even days to complete your first Amigurumi project. All the long hours will be worth it and you'll be proud of your work! |
Melissa LuangsiripanyaHi there! I'm a self-taught casual crocheter. Here you will find more details on how I made my projects as well as stories of hardship, frustrations and success! Archives
July 2018
Categories
All
|