|
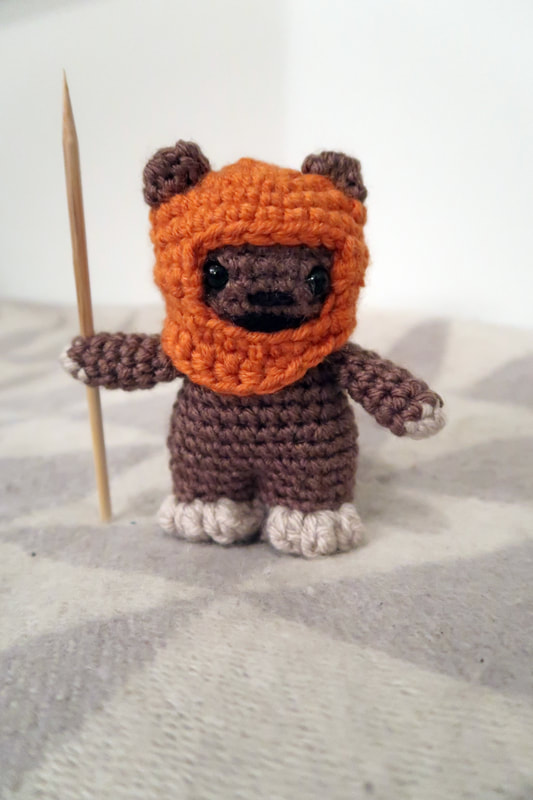
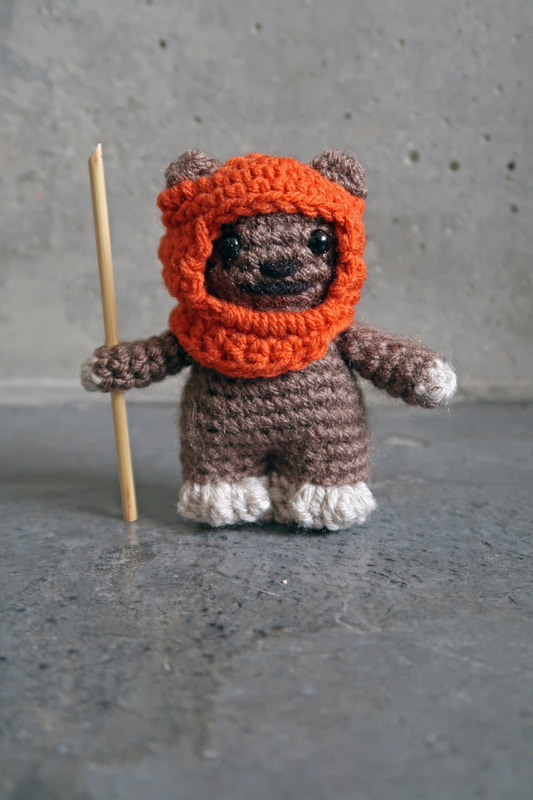
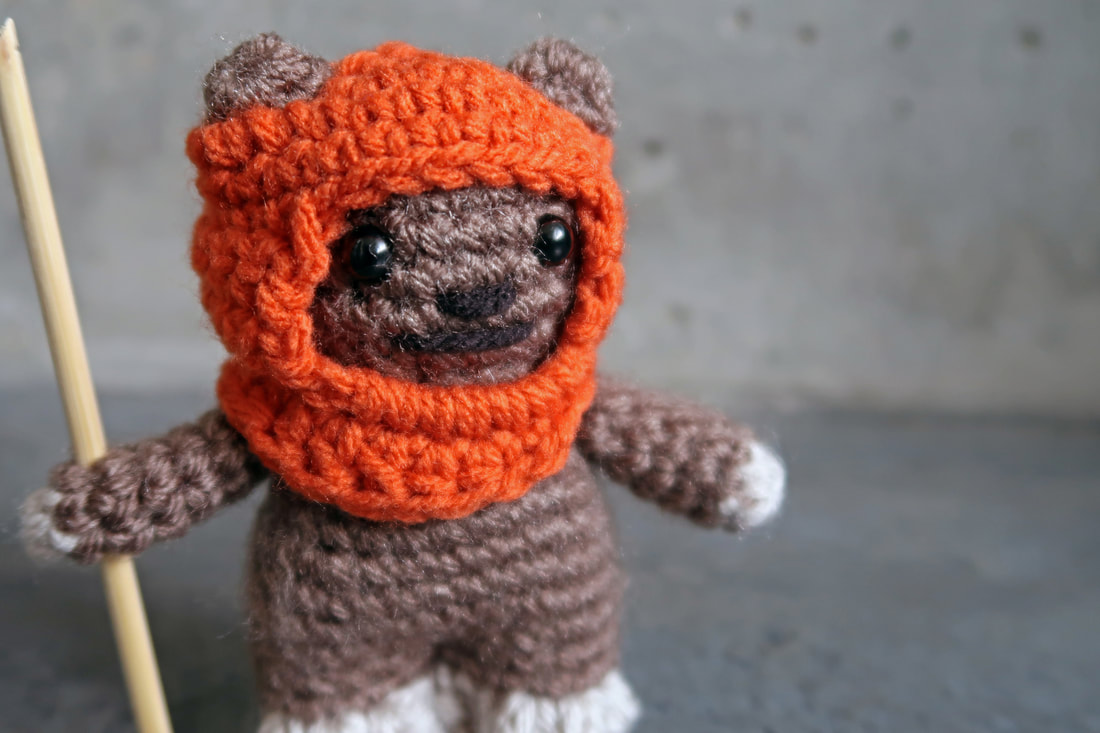
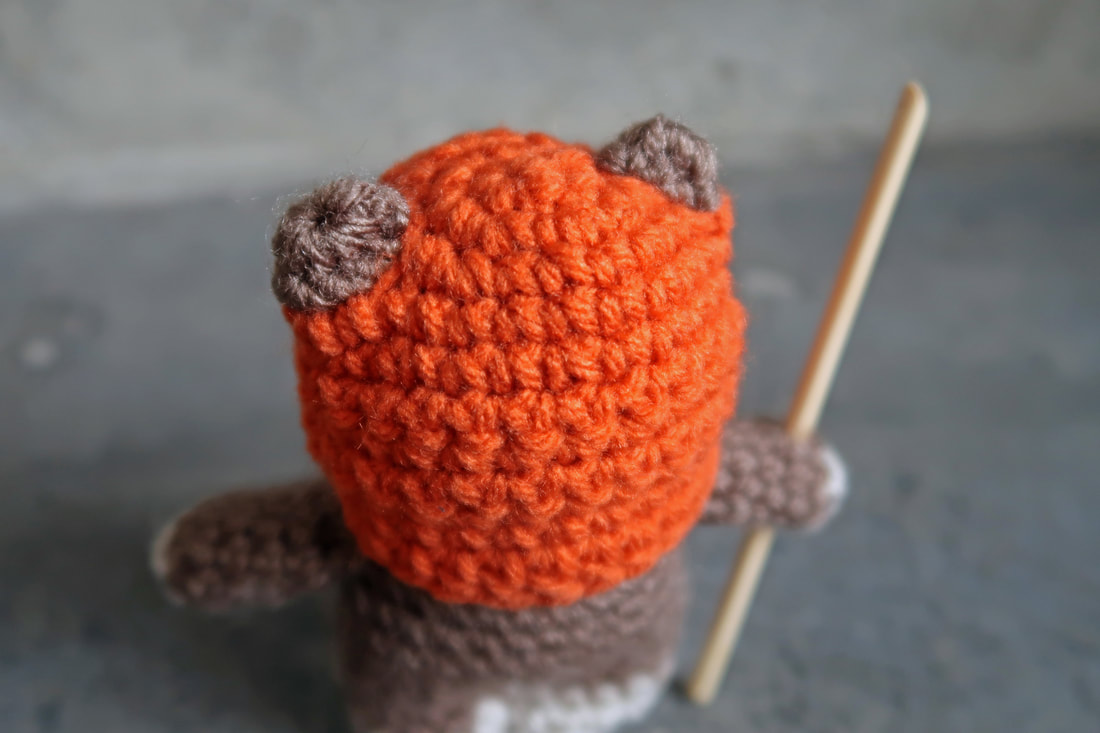
This must be one of the cutest things I have ever crocheted! So cute, I actually made two of these; the first of which I gifted to my sister which led to me making one for myself too. 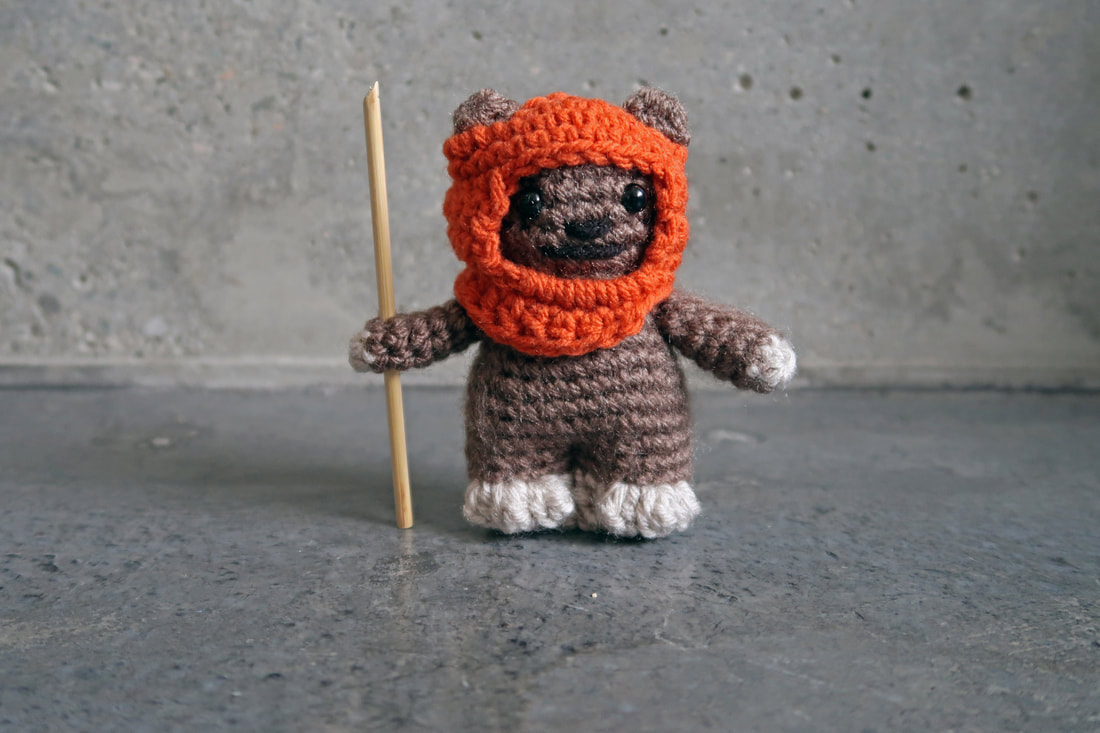 I have no complaints about the pattern by Lucy Collin - and why would I? He turned out so cute! Twice! Since I did make two, I did learn some things the second time around. On my first Wicket, I used Lion Brand, Lion's Pride Woolspun yarn (Pumpkin) for Wicket's hood. This yarn is a bulky weight [5] which made it a little difficult to work with a 3.5mm hook. So I would advise that you use a medium weight yarn [4] when using a 3.5mm hook.
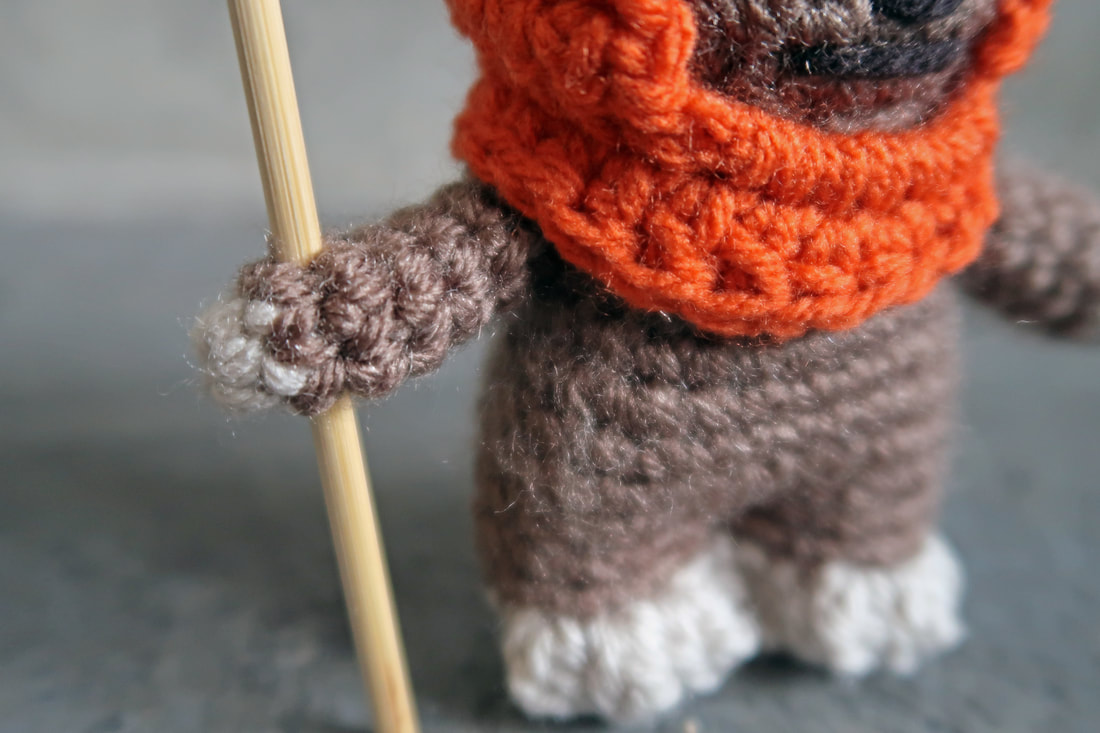
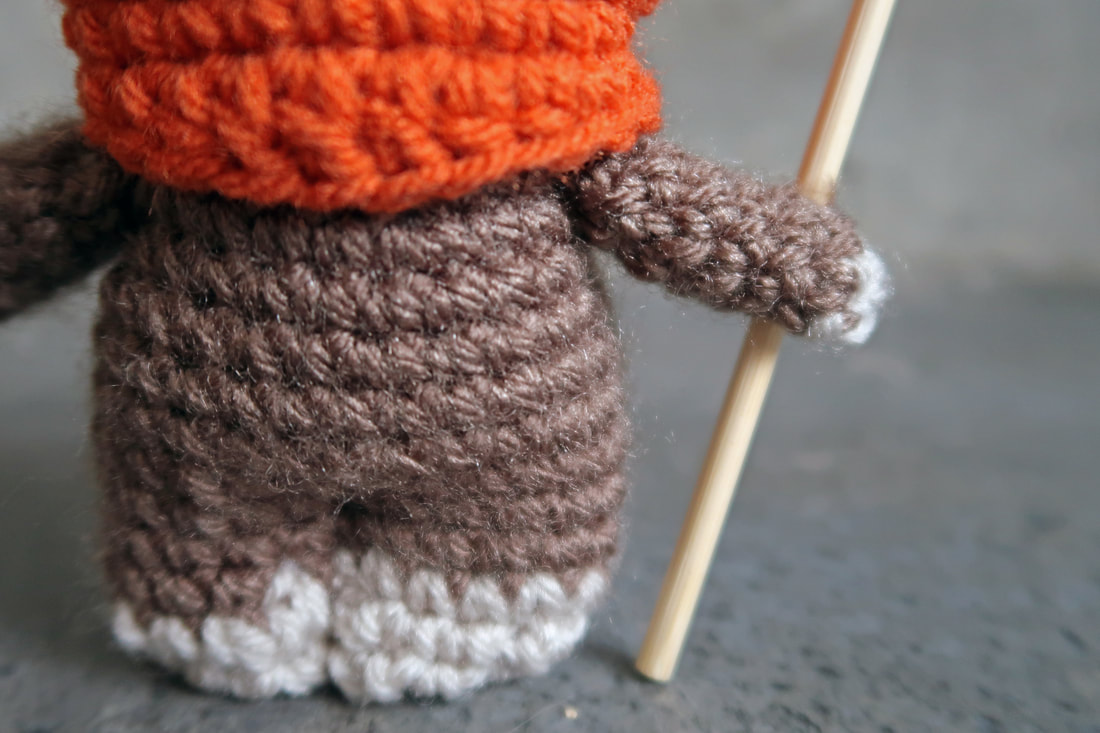
I also read the instructions incorrectly at the end of round 11 on the hood (this is the row directly below Wicket's mouth). Above is a side by side comparison of my first and second ewok. At the end of round 11, the instructions state to make 6 sc over a ch 6. Well, in the first ewok, I did not go over the ch 6, I stitched into the ch 6. Not a huge difference, but once you see it, you know it's different. As mentioned earlier, I used a bulkier weight of orange yarn the first time around. I really should have used a crochet hook larger than 3.5 mm to compensate for the heavier weight. As you can see, the first hood looks tighter and smaller; the hood's opening is smaller as well. On the second ewok, the hood is looser and drapes over the head nicely; you can also see Wicket's entire face. 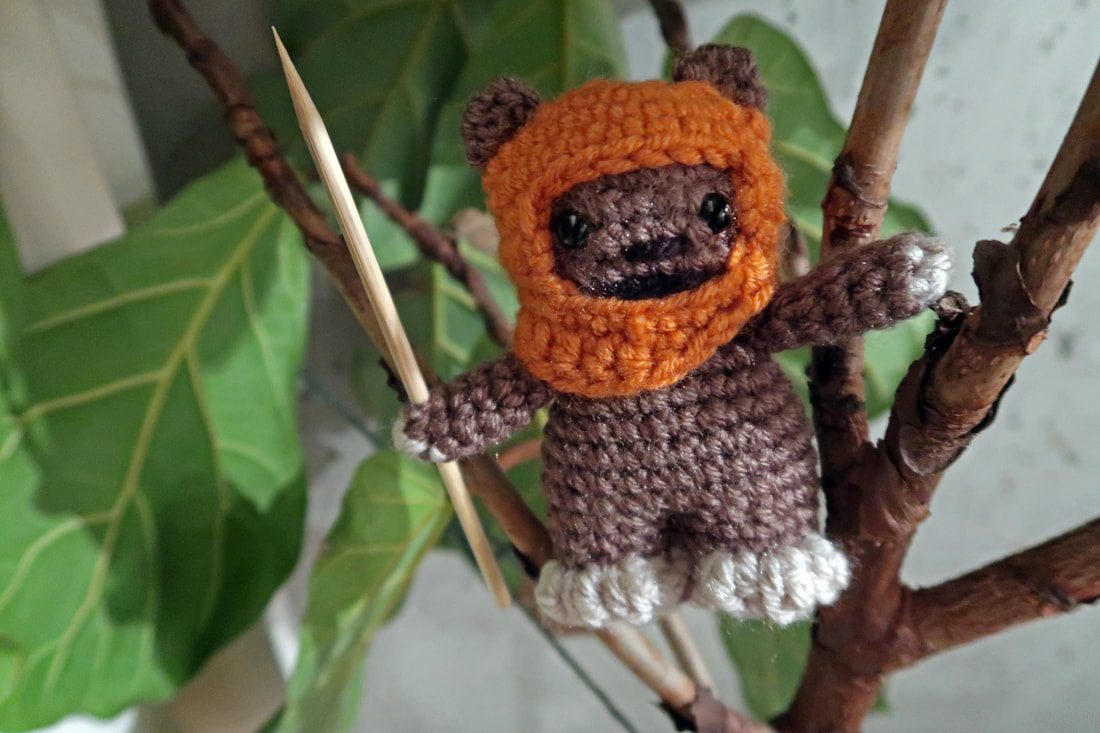 Both ewoks are approximately 4.7 inches tall; the finished size in Lucy Collin's book is listed as 3 inches tall. The photo of her ewok is also shown holding a toothpick; I ended up cutting a couple sections from a bbq skewer to make Wicket's spear as a toothpick would be much too small.
Pattern (not mine): http://www.lucyravenscar.etsy.com
Materials used: 3.5mm crochet hook, stuffing, safety eyes, bbq skewer. 1. Wicket's body: Lion Brand Vanna's Choice in Taupe; medium weight [4]. Approximately 20g needed. 2. Wicket's hands and feet: Lion Brand Vanna's Choice in Linen; medium weight [4]. Approximately 5g is needed. 3. a) Wicket's hood (The First): Lion Brand Lion's Pride Woolspun in Pumpkin; bulky weight [5]. Approximately 5g is needed. b) Wicket's hood (The Second): Loops & Threads Impeccable in Pumpkin; medium weight [4]. Approximately 5g is needed. A small amount of black yarn is also needed for Wicket's nose and mouth.
1 Comment
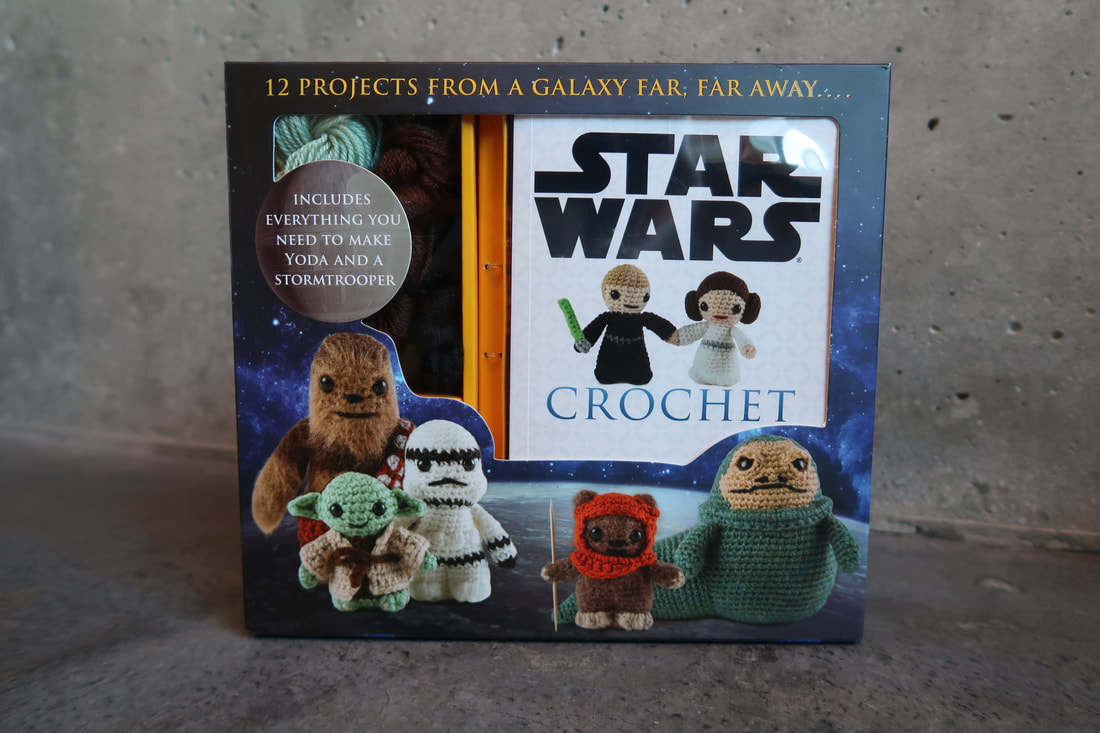
This is one of many Star Wars characters I have made during the month of December. While I was Christmas shopping, a Star Wars crochet kit caught my eye when I was in the queue line. Obviously, I couldn't leave the store without one.
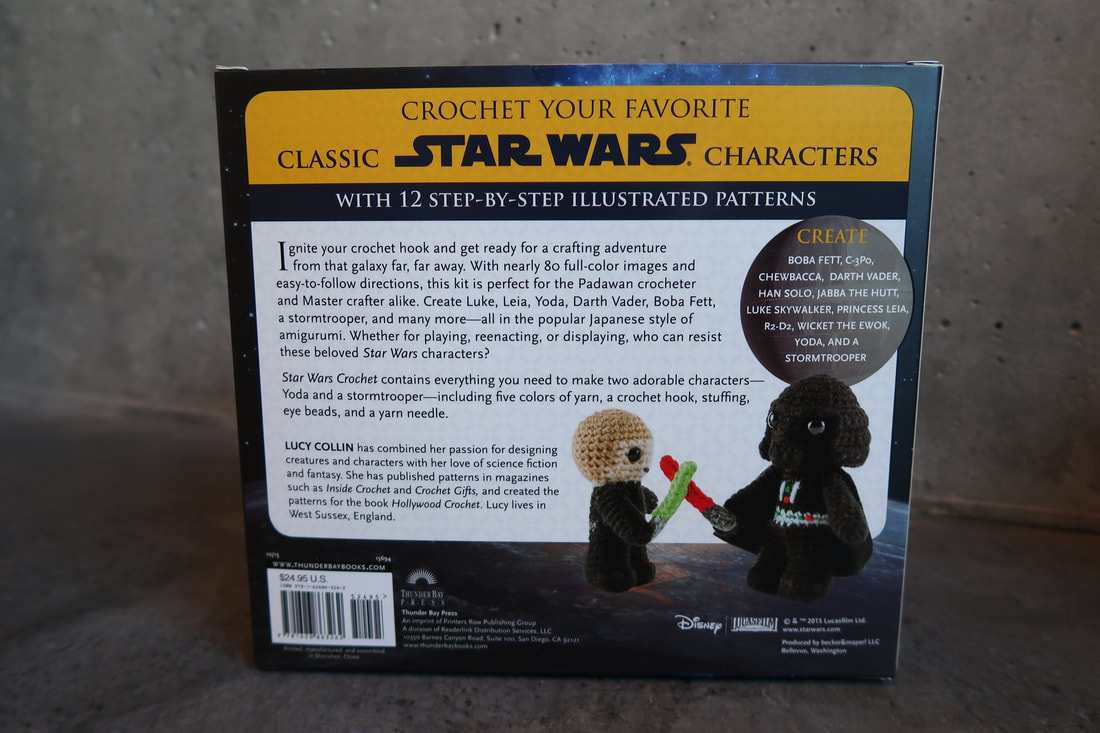
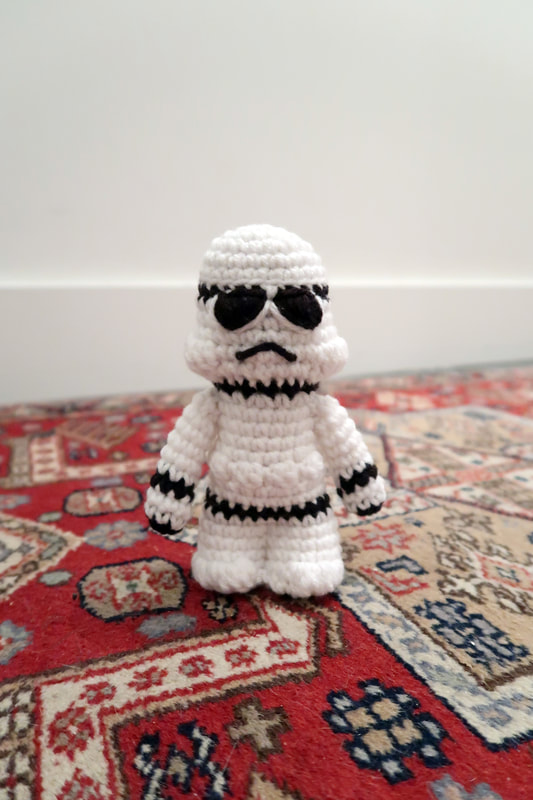
This kit includes patterns for 12 Star Wars characters written by Lucy Collin: 1) Yoda 2) Stormtrooper 3) C-3PO 4) Princess Leia 5)Wicket the Ewok 6) Luke Skywalker 7) R2-D2 8) Han Solo 9) Chewbacca 10) Darth Vader 11) Boba Fett 12 Jabba the Hutt Patterns can also be found in Lucy's Etsy shop (http://www.lucyravenscar.etsy.com). Also included in the kit are five colours of yarn (for Yoda and a Stormtrooper), stuffing, 3.5mm crochet hook, two sets of safety eyes, and a yarn needle. 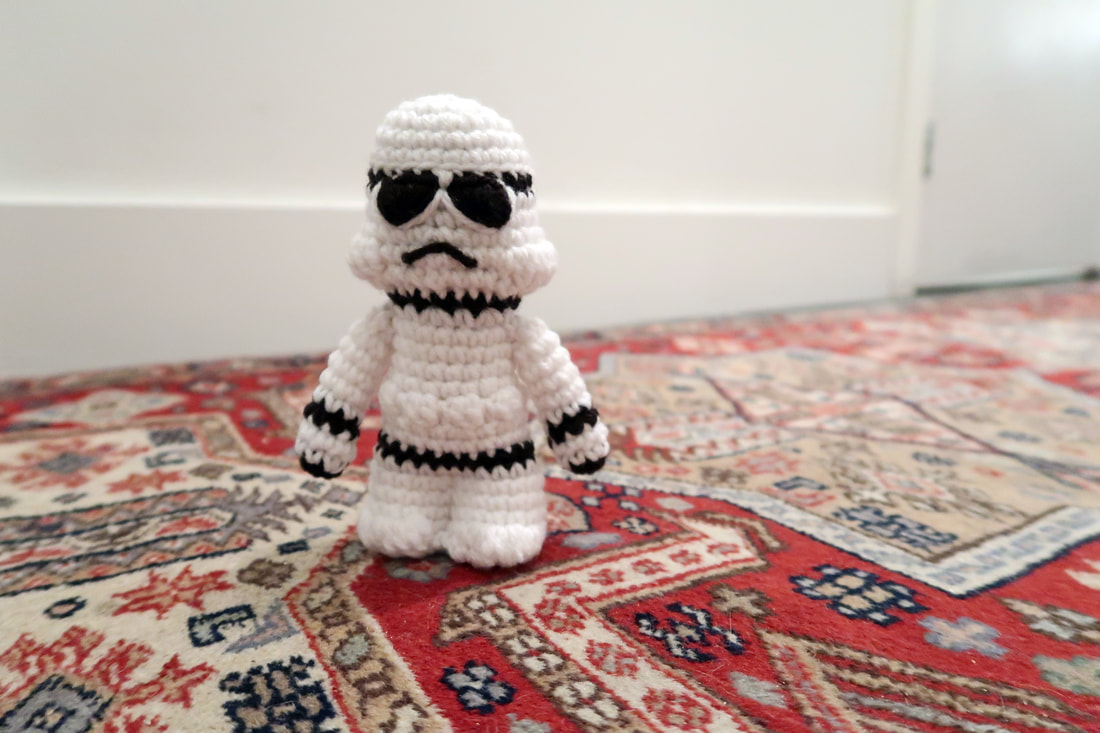 The pattern for the Stormtrooper was very easy to follow; some special techniques were used and instructions for these techniques are found at the beginning of the pattern book. The head, body, and legs are created in the round and is a single piece. The arms are created separately and then sewn onto the body. The pattern calls for the use of safety eyes which I chose not to follow and instead stitched yarn to create the 'aviator shades' as seen above. I felt that the round safety eyes would not have been true to the character.
The finished size of my Stormtrooper is approximately 5 inches tall; the pattern says 3.5 inches. However, I ended up not using the yarn included in the kit. I used some leftover Loops & Threads yarn which is a slightly thicker yarn than what is included in the kit, thus my Stormtrooper is a slightly larger size. This Stormtrooper took me approximately 2.5 hours to complete and I was quite pleased with the simplicity of the pattern, the finished size and the final look. It is definitely something I would make again, and probably will have to as I happily gifted this one to a friend! Visit my blog again to see what other Star Wars characters I have completed! Materials used:
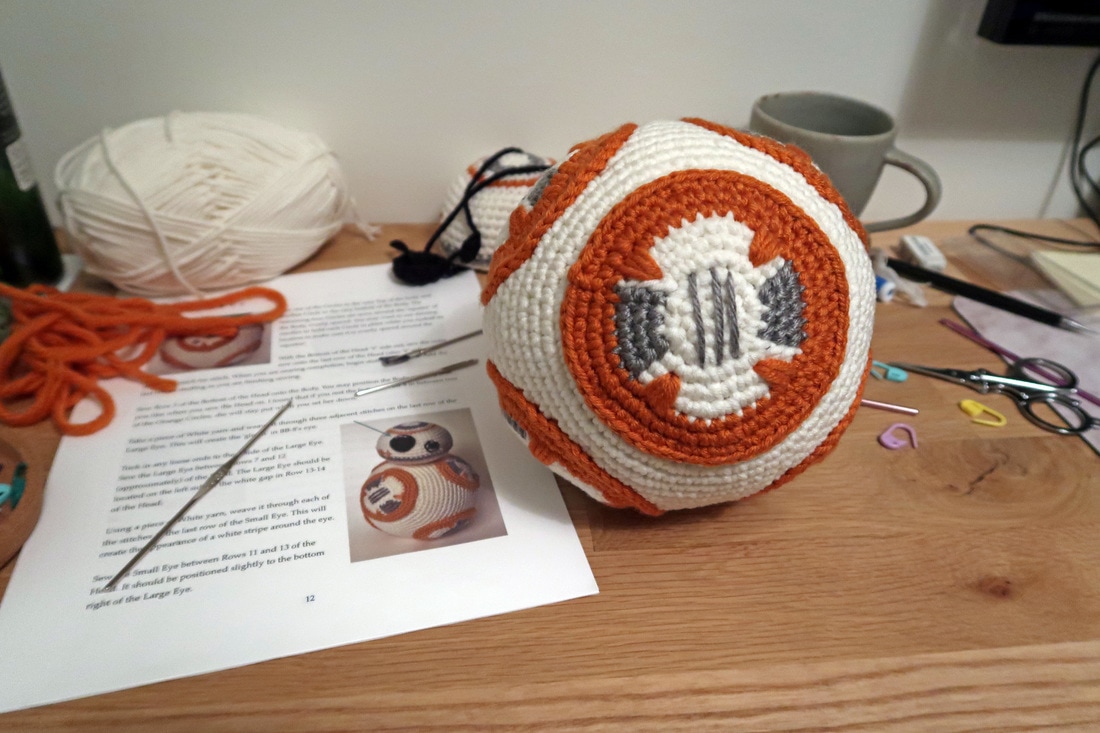
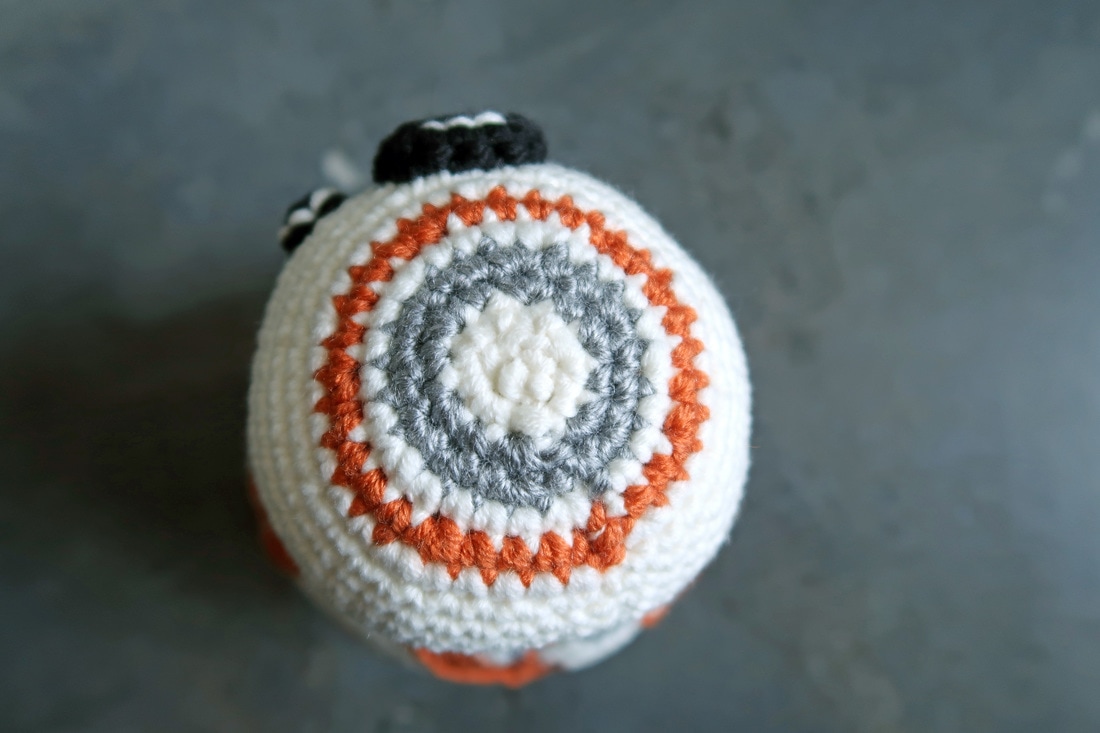
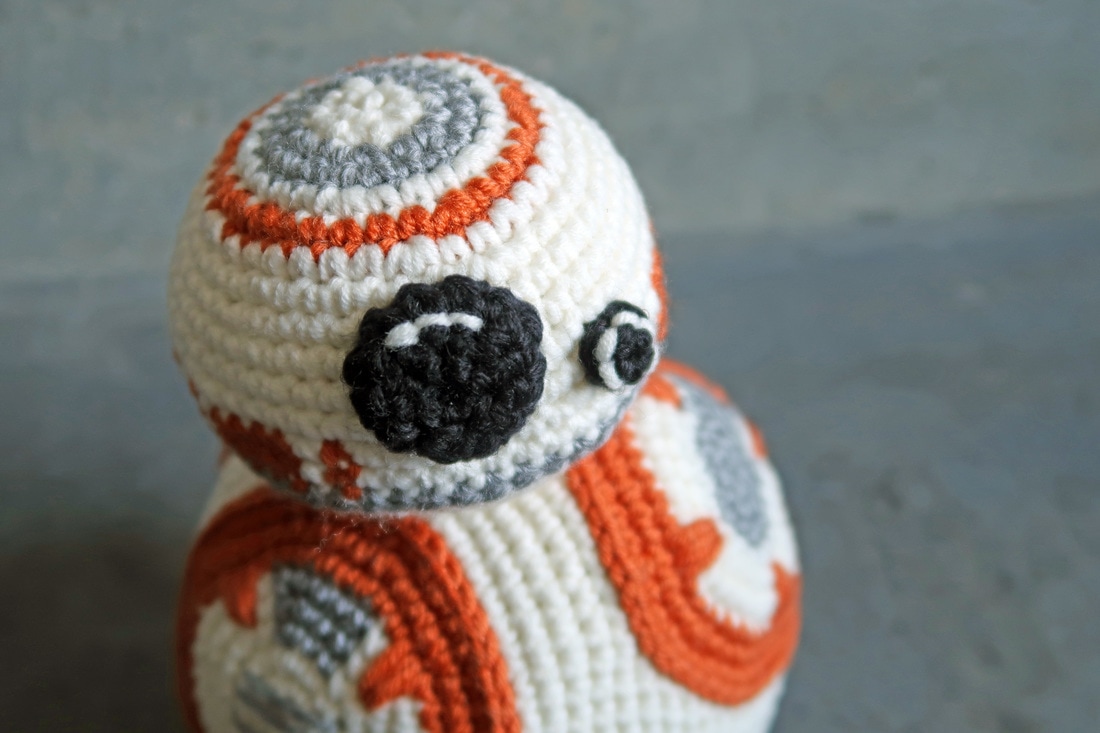
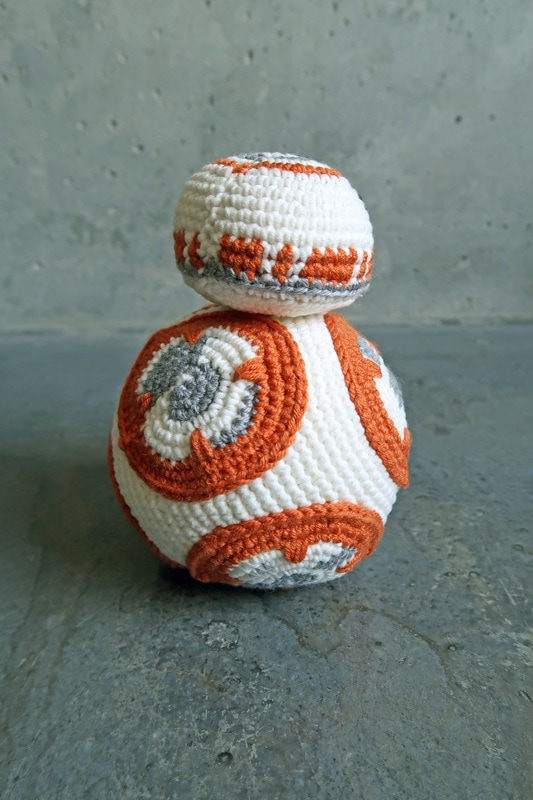
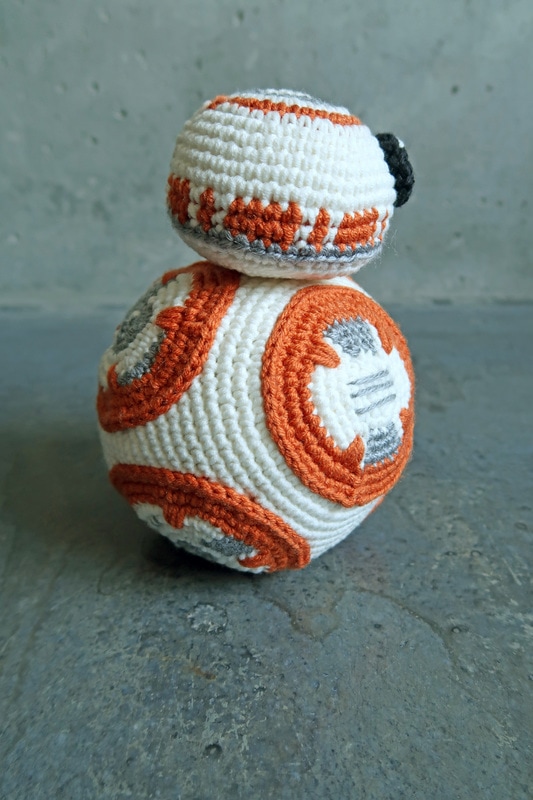
3.5mm crochet hook 1. Loops & Threads Impeccable yarn in White (medium weight [4], 253m/127.5g). Approximately 25g of white yarn is needed. 2. Loops & Threads Impeccable yarn in Black (medium weight [4], 253m/127.5g). Approximately 5g of black yarn is needed plus a little more if you stitch the eyes as I did. I was super excited to purchase the second "Edward's Menagerie" crochet book by Kerry Lord which contains many patterns for birds. If you haven't heard of Kerry Lord, I highly recommend checking out her work (www.thetoftalpacashop.co.uk). She's one of my crochet idols and I love her laid back and minimalist approach to her animals. A very important thing to keep in mind is that the book is in UK terms, i.e. a single crochet (sc) in North America, is a double crochet (dc) in the UK. For my first bird, I decided to stick with a bird from the Level 1 section - "Sophia the Flamingo" (which was also Kerry's first bird). 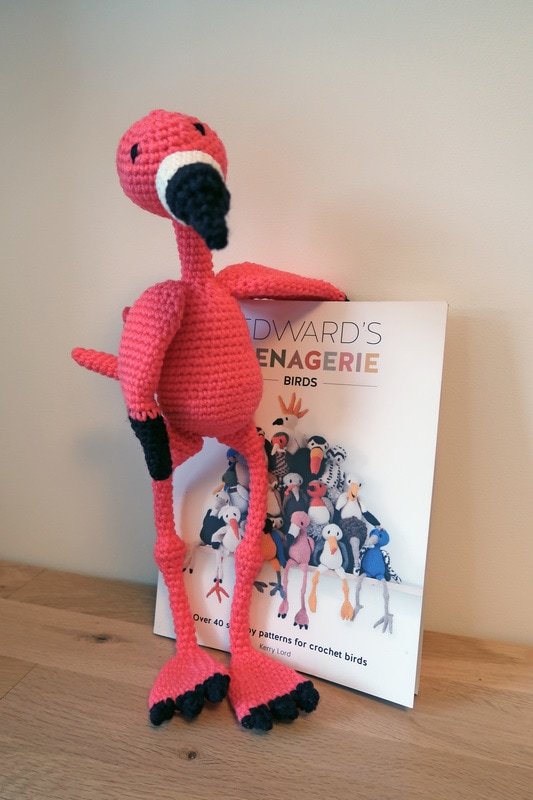 Sophia the Flamingo posing with Kerry Lord's book "Edward's Menagerie, Birds" Just like Kerry Lord's first book, there are standard forms for all the body parts so you will have to flip to different sections within the book in order to complete an animal. I found no issue with this as you are only flipping between each part; there's no need to look at more than one section of the book at a time. The book is broken into many parts, the key sections are: - Standard Forms - The Patterns - Technicals One benefit of using standard forms is that once you create your first animal, the subsequent animals seem a little easier because they all include the same forms. Also, the book stays a small size by not repeating and printing the same pattern for every animal (the book is less than half an inch thick). There are of course some differences between the birds such as increasing the number of rounds to create a longer neck, legs etc, and these are noted on the pattern page for that specific animal. 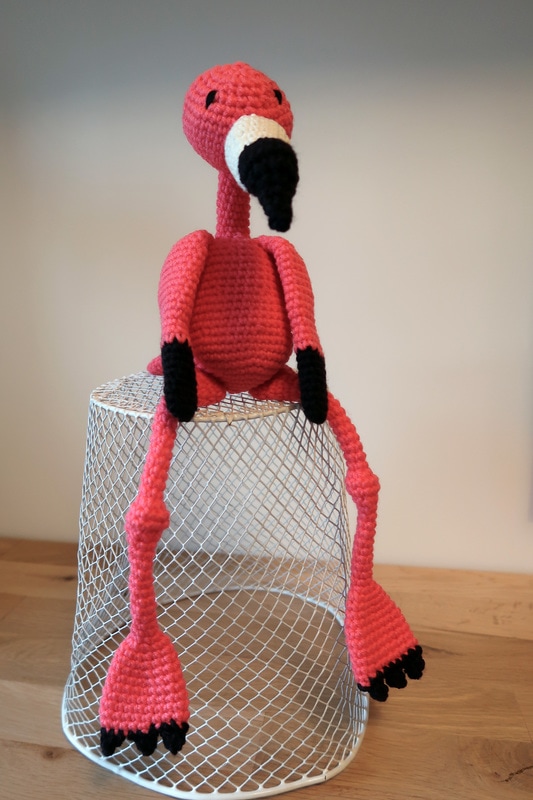 This flamingo requires no cage. The only part I struggled with were the claws. You must use Kerry's 'splitting a round' technique to split the foot into the three claws. I found the instructions in the book to be too general and I just wasn't getting it. Thankfully, the Toft website includes help videos for many different techniques. You'll find the "splitting crochet rounds" video here. After watching her video, I had that "light bulb" moment and was able to carry on and complete all the claws. The splitting technique was used again for the tail. I quite enjoyed making this flamingo. It didn't require a lot of stuffing, and other than the claws, was relatively simple to create (as mentioned above, the flamingo is a Level 1 bird). Do you own "Edward's Menagerie, Birds"? What animals have you made? I can't wait to make my next bird! Materials used: 3.5 mm hook 1. Loops & Threads Impeccable yarn in Arbor Rose (medium weight [4], 253 m/127.5 g). I only used approximately one half to two-thirds of the ball of yarn. 2. Black yarn for claws, beak, wing tips and eyes. I used a scrap ball of yarn (same black yarn I used for my first BB-8). 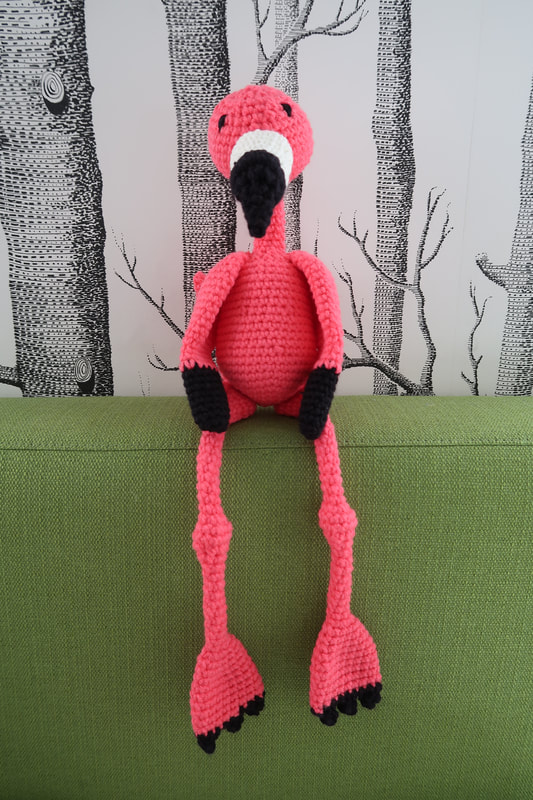 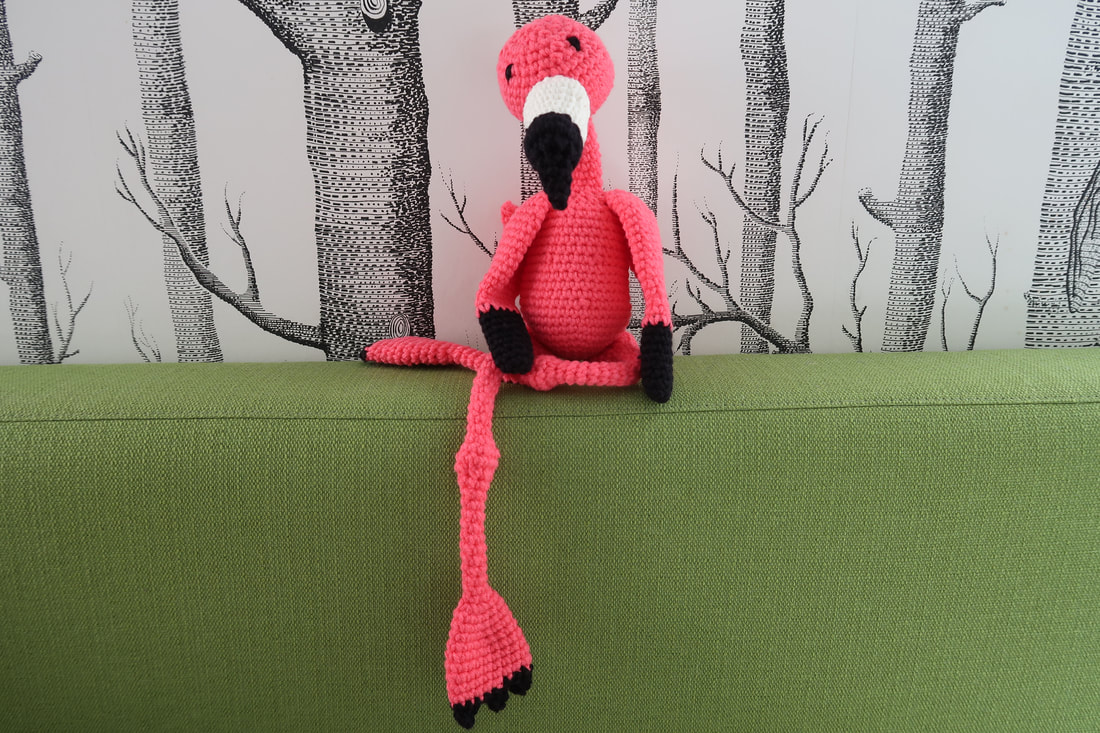 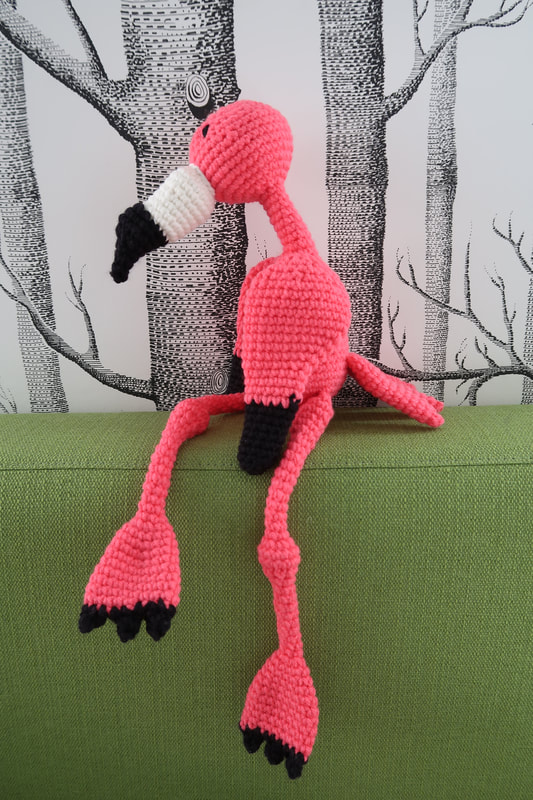 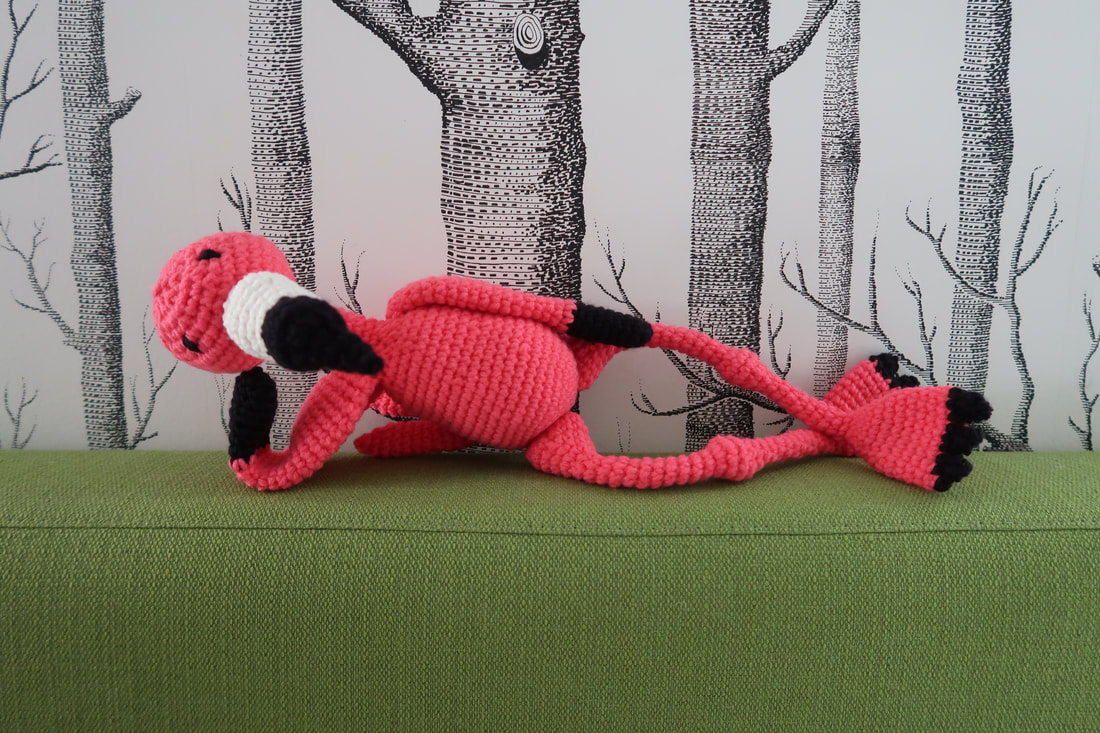 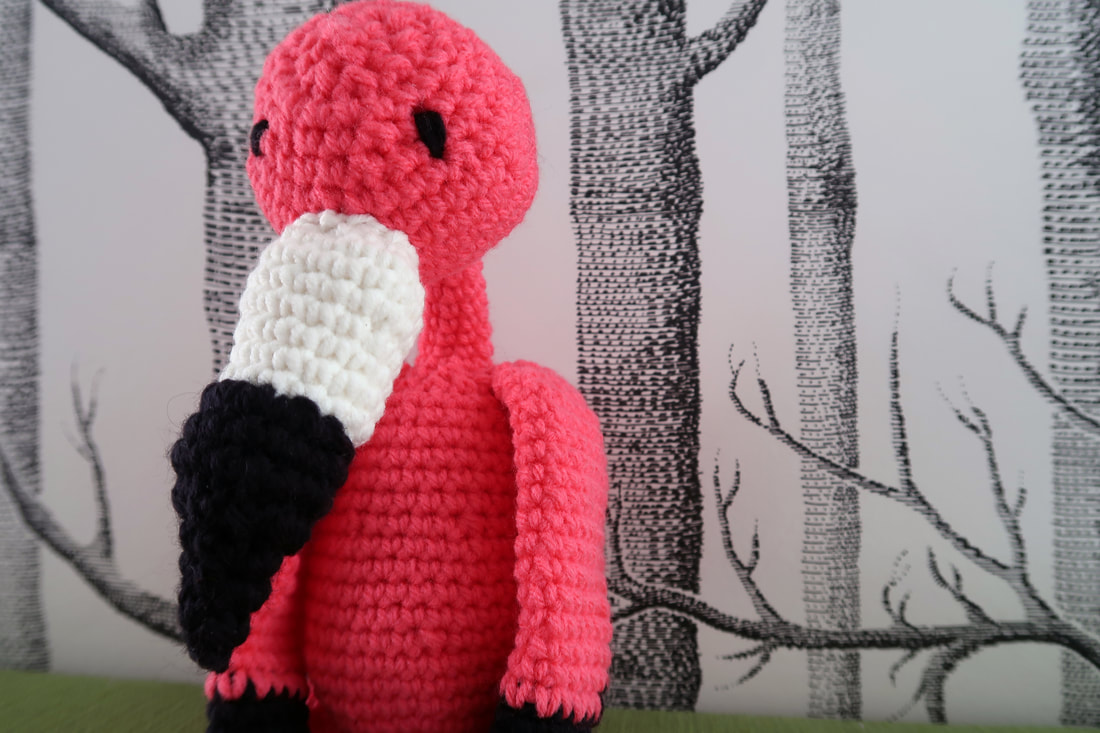 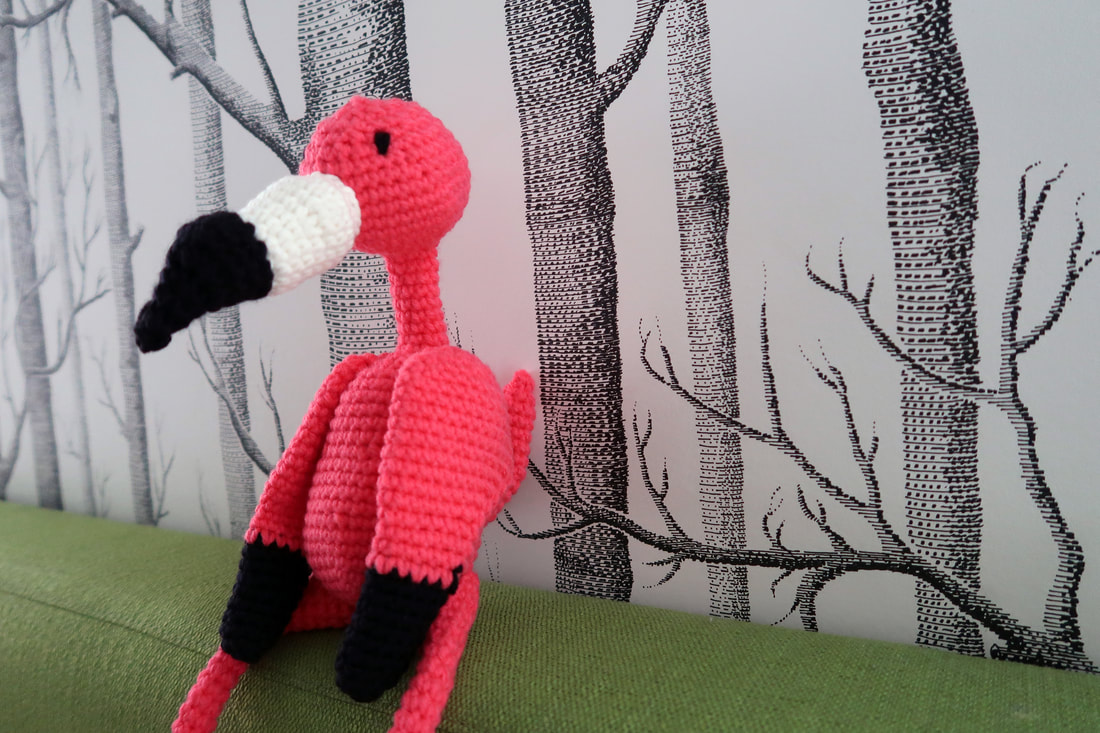 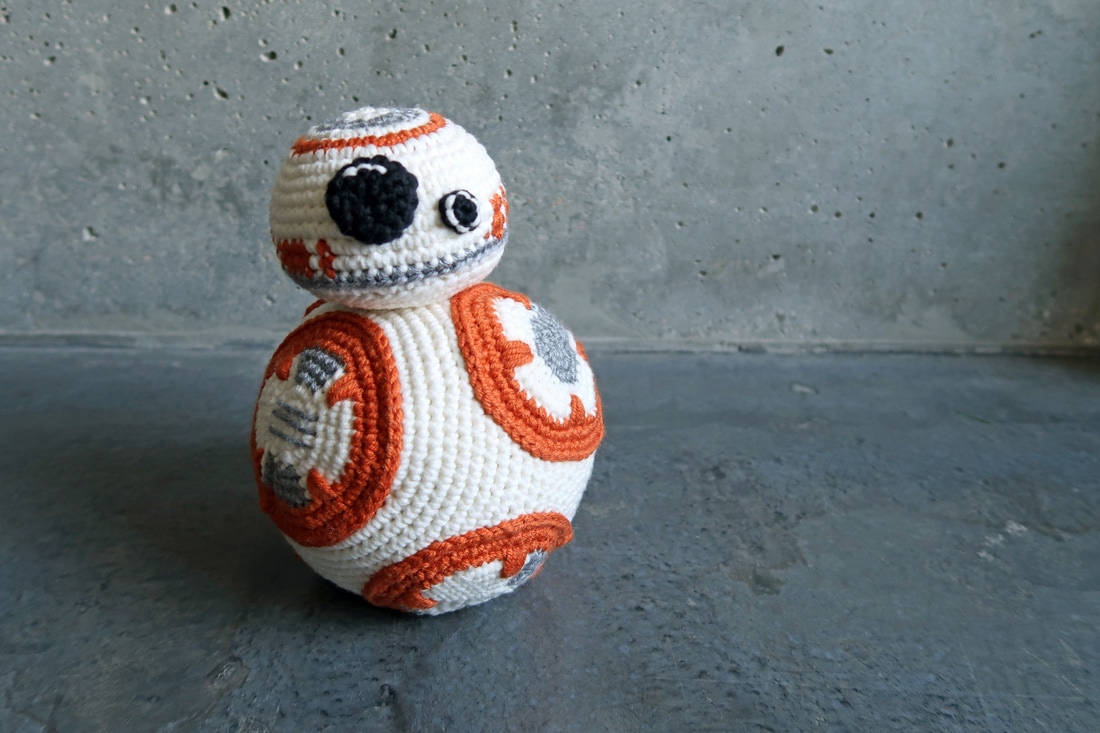 As promised, I've returned with the full details on the BB-8 I created for May the 4th (see original post here). I was very hesitant to create BB-8 as I thought it would take me forever (or never) to figure out a pattern to make BB-8. Luckily, I found a pattern by the creator of the "Ideal Sphere" patterns (which I love!). I thought it was too good to be true when I saw she had posted a BB-8 she had made on her blog AND that she had a pattern available to purchase. I immediately purchased a pdf copy of the pattern from her Etsy shop: MsPremiseConclusion. Since I have been using her patterns for spheres, I found the language used in the pattern very easy to follow. The pattern is very thorough and includes a list of what yarn you will need, final size of BB-8, and hook size. She has also included extra information regarding right side vs. wrong side and switching colours. Within the pattern, each part of BB-8 is broken down into pieces which you are instructed to make and sew together at the end; all steps have at least one colour picture for reference.
Her pattern is AMAZING! She has even included unique patterns for each 'circle' that is on BB-8's body. She is obviously very into Star Wars and has put extreme care and attention to ensure BB-8 looks as accurate as possible - something I cannot express enough how much I appreciate! I probably should have tried harder to find an orange yarn in a medium weight. Since I ended up purchasing something that was bulky, I actually used a 3.0mm hook whenever I was using the orange yarn. Otherwise, if I had used a 3.5mm hook for the orange yarn, the size (especially for the circles) would have been off. I honestly cannot think of what I would do differently regarding the pattern itself. My BB-8 looks quite similar to hers which is just proof that her pattern works! I highly recommend this pattern and believe the cost to purchase the pattern was fair and SO worth it!
BB-8 Materials: - Loops & Threads, Ringspun yarn in Off White (medium weight [4], 145m/100g); I used one complete ball plus a little bit from a second ball. - Lion Brand, Lion's Pride Woolspun yarn in Pumpkin (bulky weight [5], 116m/100g); a bulky weight ended being chosen because I gave more priority on finding the the right 'orange'. I used about half of one ball. - Red Heart, with wool in Jet (worsted weight [4], 131m/100g); I used very little of this yarn, probably less than 2 m. If you already have a spare ball in black, do not purchase a new one. - Red Heart, Soft in Light Grey Heather (worsted weight [4], 194m/113g); I only used about a quarter of a ball.
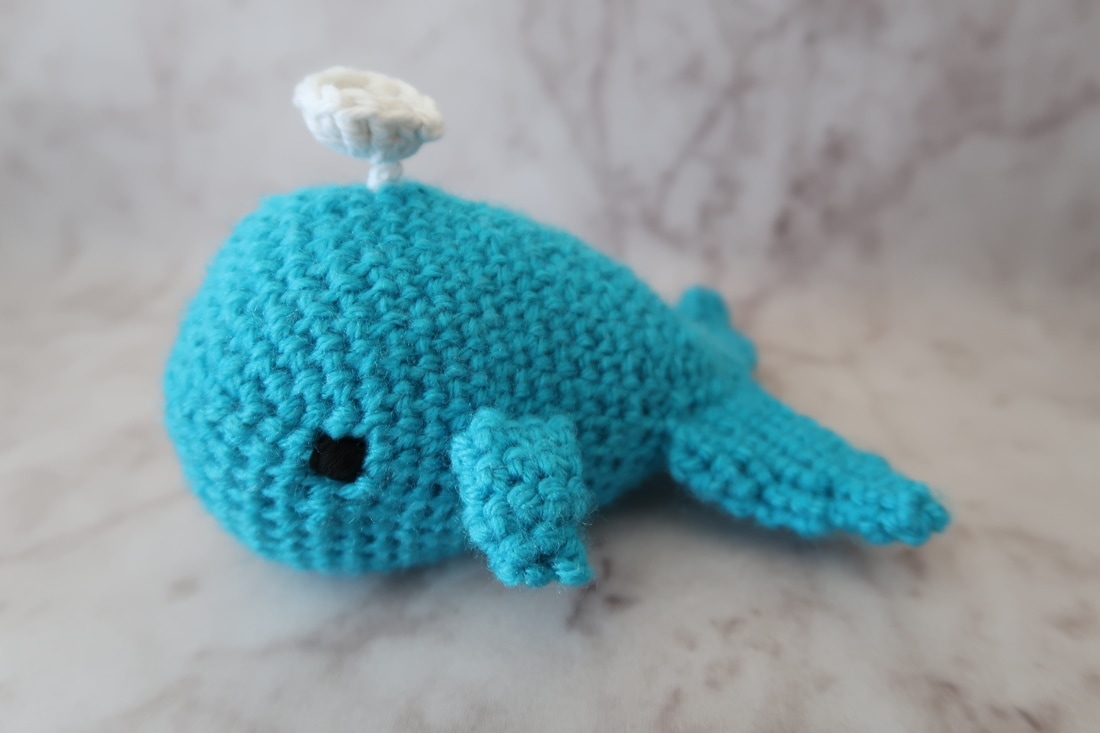 Continuing on my quest to find "one day" projects, I decided to try this little whale found on Pinterest. There is a free pattern available online from "Pops de Milk" (popsdemilk.com/cutest-little-sperm-whale/). Before reading the free pattern online, I actually attempted to make one just by looking at the picture. Unfortunately I wasn't very satisfied with the body I made and wasn't sure how to make the tail, so I decided to take a look at the pattern. The pattern is clear and easy to follow: there is a list of materials needed, a stitch guide, and notes on what size hooks should be used. The pattern begins with the body which is worked in the round. After finishing rounds 1 to 14, my work looked more like a square rather than a circle. The increases in each round were "on top" of each other which made the front of my whale not as clean as I would have liked (please refer to picture below). 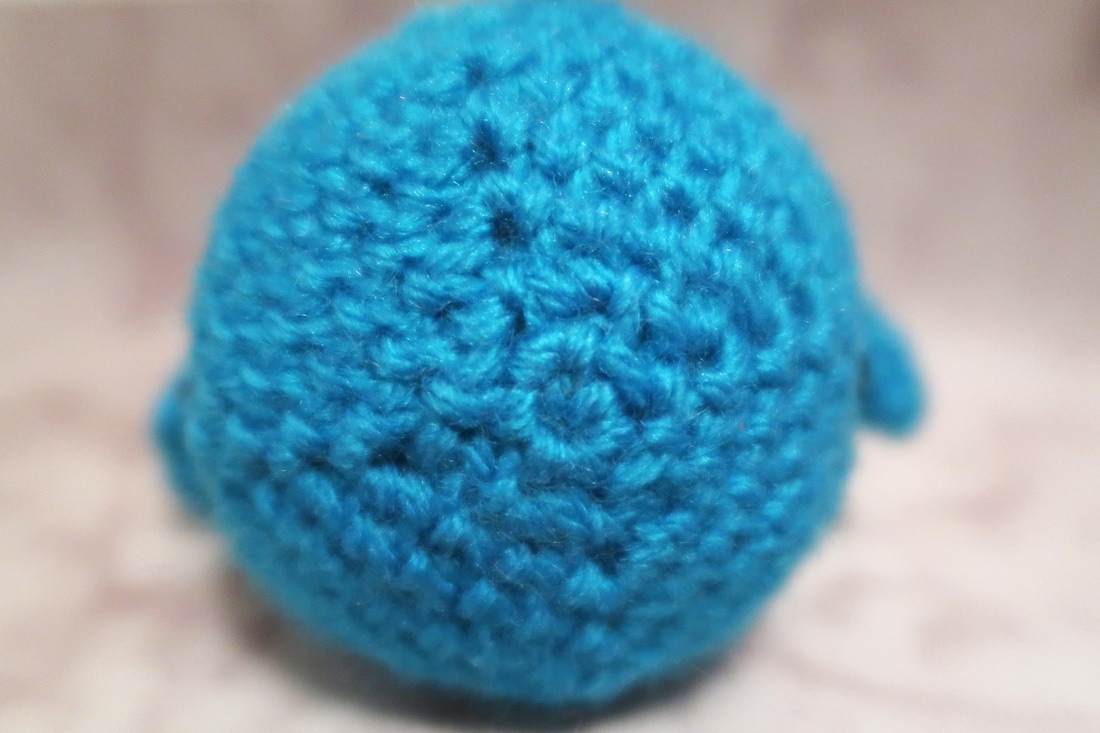 When making spheres, I have been following this amazing set of patterns:(mspremiseconclusion.wordpress.com/2010/03/14/the-ideal-crochet-sphere/). The writer has gone above and beyond creating patterns for different sized spheres; she has even done the math! Every sphere I've made following her patterns have been pretty close to perfect looking spheres (or "ideal" in the writer's case). If I were to make this whale again, I would modify it using one of the "ideal" sphere patterns. Other than the look of the front of the whale, I was very happy with the overall shape of the body. I should mention, I did not use the exact same size hooks the pattern called for (I don't own a 3.75mm or 3.00mm); for the body I actually used a 3.50mm hook and 2.75mm for the fins and flukes. Next came the flukes for the whale's tail. As mentioned above, I used a 2.75mm hook instead of a 3.00mm hook. Once I finished the flukes, I thought they looked a bit too big and not proportional to the size of the body. I considered re-making the flukes and altering the pattern to make them smaller, but I felt that was going to take too much work and time. I definitely did not want to re-make the whale's body bigger either so I kept my flukes as is. 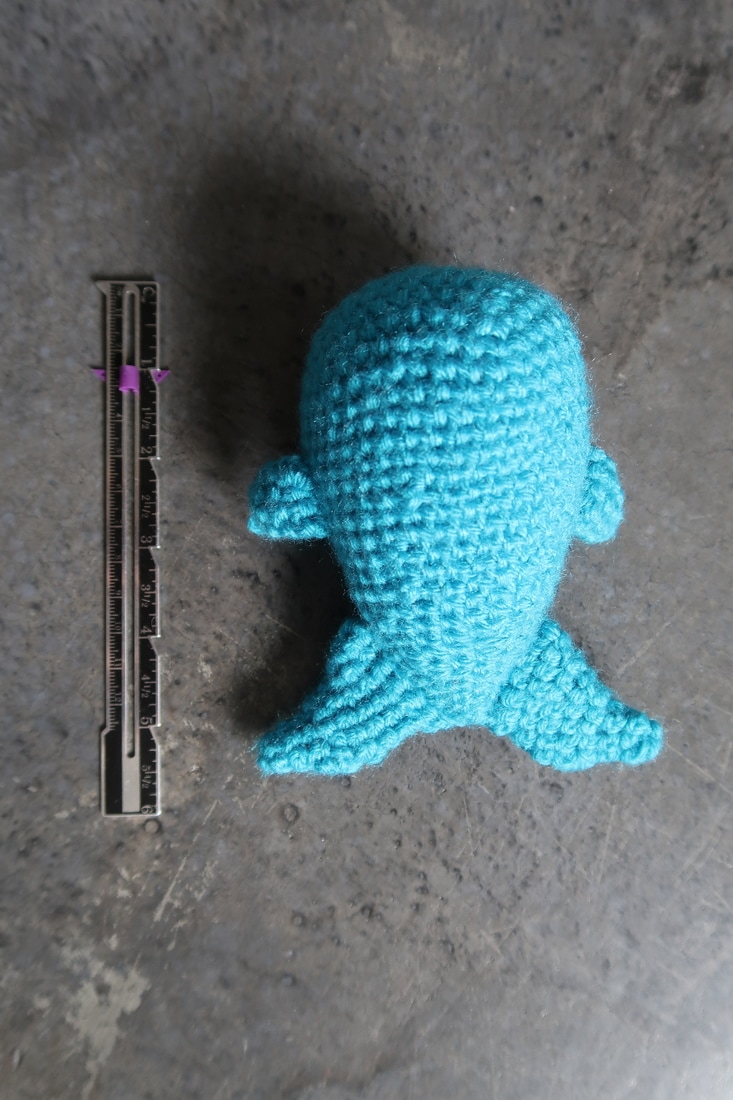 The pattern calls for 6 rounds to create the fins; however, I felt they were too long and reduced mine to only 4 rounds. I also added some "spray" from the imaginary blow-hole, which actually means my whale is no longer a sperm whale. Since I made the blow-hole on top, my whale is now a blue whale. The blow-hole on a sperm whale is actually located on the left side of a sperm whale's head! 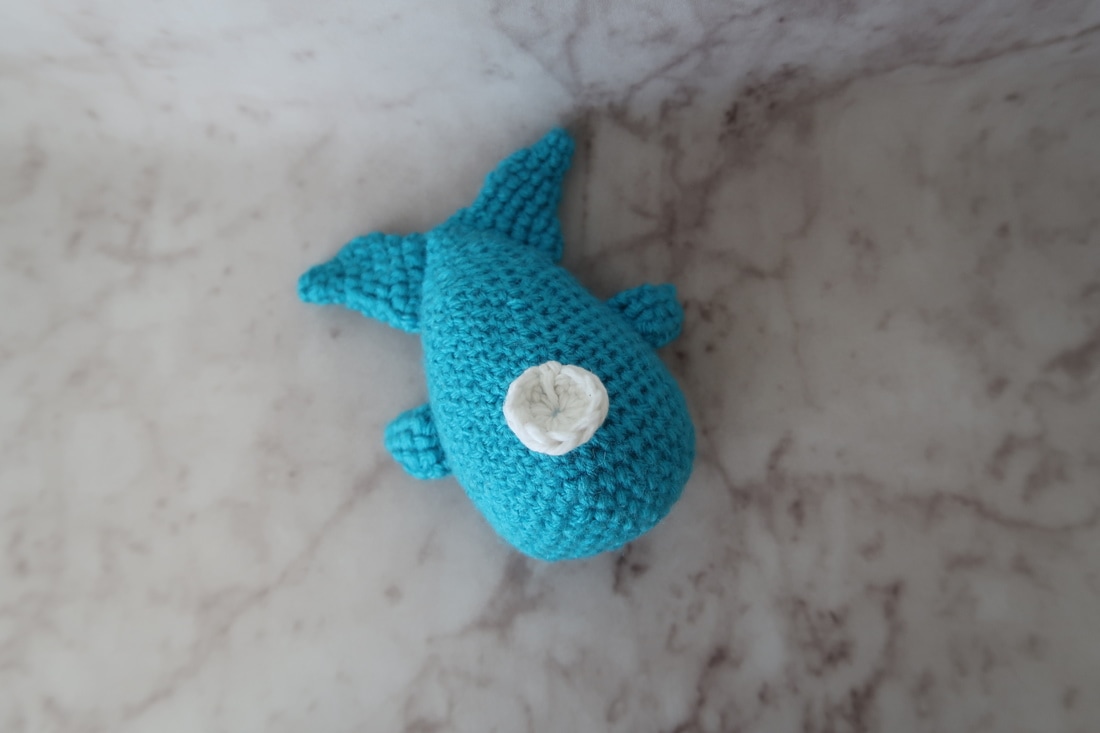 Other than the look of the front of the head, I was generally happy with this pattern. Things to keep in mind: - Don't forget to count your stitches and use stitch markers. - Be consistent with your stitch tension. - If you don't have safety eyes (like me) you can add some eyes using some embroidery skills. Blue Whale Materials: - 3.50mm hook for body - 3.00mm hook for flukes and fins - Lion Brand Yarn, "Vanna's Choice" in Aqua (body, fins and flukes) - Bernat Cotton yarn in Off White (blow-hole spray) - black embroidery thread (eyes) - fiber fill stuffing 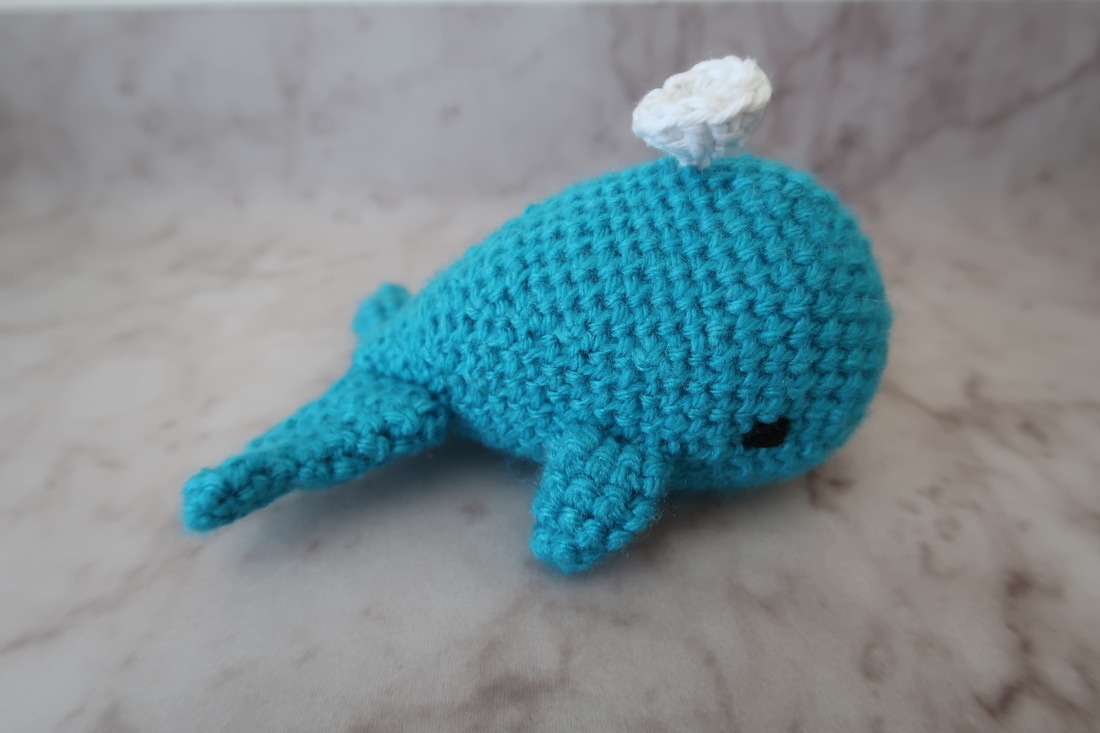 |
Melissa LuangsiripanyaHi there! I'm a self-taught casual crocheter. Here you will find more details on how I made my projects as well as stories of hardship, frustrations and success! Archives
July 2018
Categories
All
|